目录
一、Windows环境下的YOLOv4目标检测
1、环境配置
2、克隆或下载YOLOv4
3、Visual Studio2019配置YOLOv4项目
4、Visual Studio2019编译YOLOv4项目
5、YOLOv4权重文件下载
6、YOLOv4目标检测测试
7、使用YOLOv4训练自己的数据集
8、Anchor Box先验框聚类分析与修改
二、Linux环境下的YOLOv4目标检测
1、环境配置
2、YOLOv4下载和编译
3、测试图片
三、提高YOLOv4目标检测性能的技巧
1、YOLOv4训练前的改善技巧
2、YOLOv4训练后的改善技巧
一、Windows环境下的YOLOv4目标检测
1、环境配置
环境准备:Win10、CUDA10.1、cuDNN7.65、Visual Studio 2019、OpenCV 3.4
(1)Visual Studio2019企业版安装
(2)NVIDIA驱动下载与安装
(3)下载并安装CUDA10.1,下载安装cuDNN7.65
对于cudnn直接将其解开压缩包,然后需要将bin,include,lib中的文件复制粘贴到cuda的文件夹下,比如:C:\Program Files\NVIDIA GPU Computing Toolkit\CUDA\v10.1
(4)CUDA安装测试
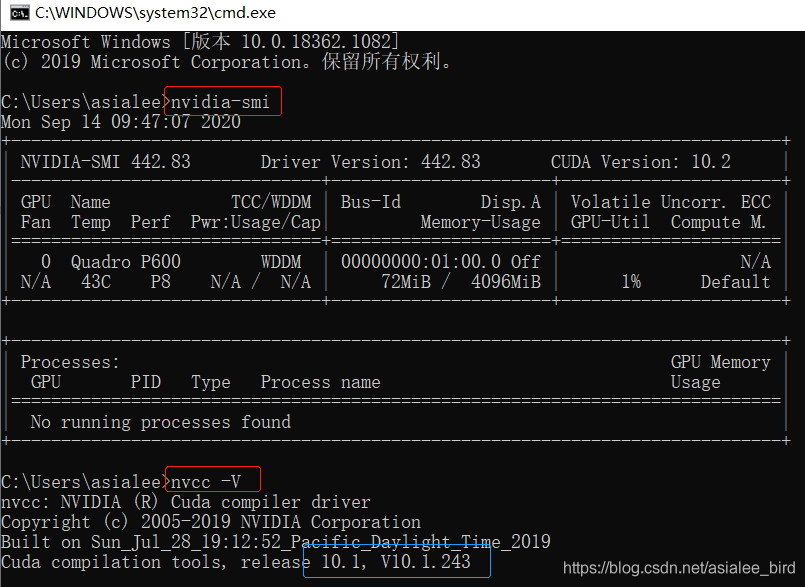
(5)OpenCV安装
下载OpenCV3.4;运行exe(其实是解压),将压缩包解压到相应目录,如: C:\Program Files (x86)\opencv;在系统变量 Path 的末尾添加:C:\Program Files (x86)\opencv\build\x64\vc15\bin
2、克隆或下载YOLOv4
- YOLOv4网址:https://github.com/AlexeyAB/darknet
- 如果安装了Git软件,可直接克隆项目到本地:git clone https://github.com/AlexeyAB/darknet
- 在GitHub上直接下载,并将解压后的darknet-master文件夹改名为darknet
3、Visual Studio2019配置YOLOv4项目
(1)复制opencv文件
在文件夹C:\Program Files (x86)\opencv\build\x64\vc15\bin的两个dll文件:opencv_ffffmpeg340_64.dll和opencv_world340.dll复制到D:\darknet\build\darknet\x64
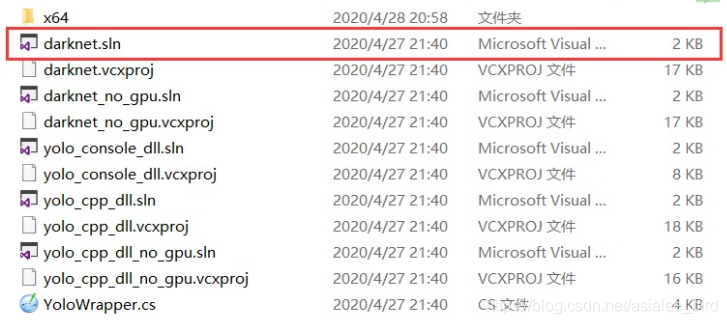
(2)Visual Studio 2019项目配置
用visual studio2019打开darknet.sln文件
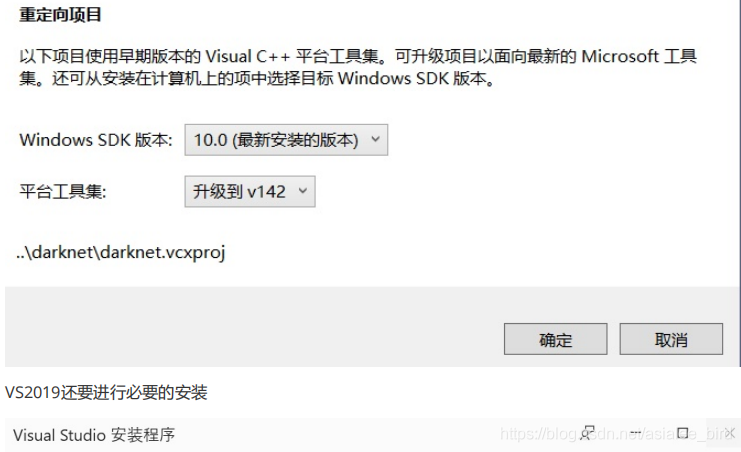
然后需要重启电脑。
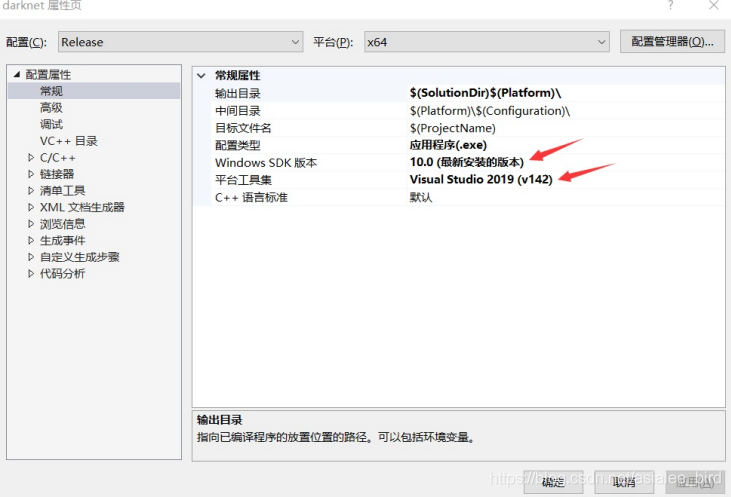
打开darknet.sln项目,对其进行配置:项目 ->属性;注意应选release和x64


(3)接下来几个步骤比较关键
添加opencv3.4的包含目录和库目录(按照自己的opencv3.4的路径)包含目录:
C:\Program Files (x86)\opencv\build\include
C:\Program Files (x86)\opencv\build\include\opencv
C:\Program Files (x86)\opencv\build\include\opencv2
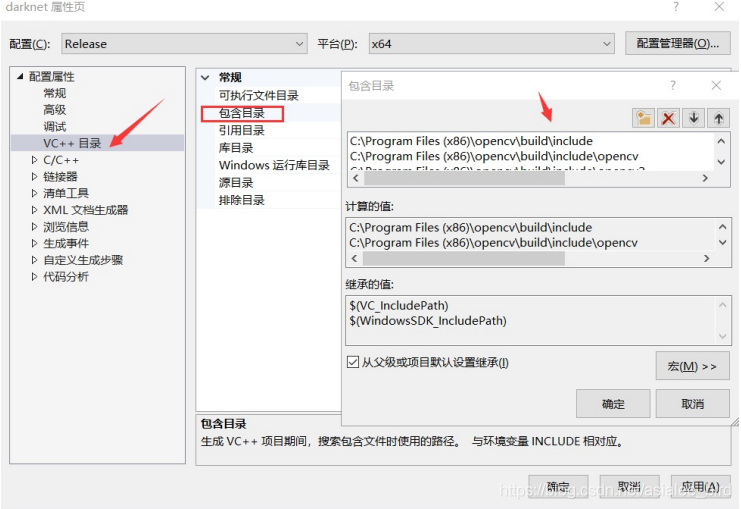
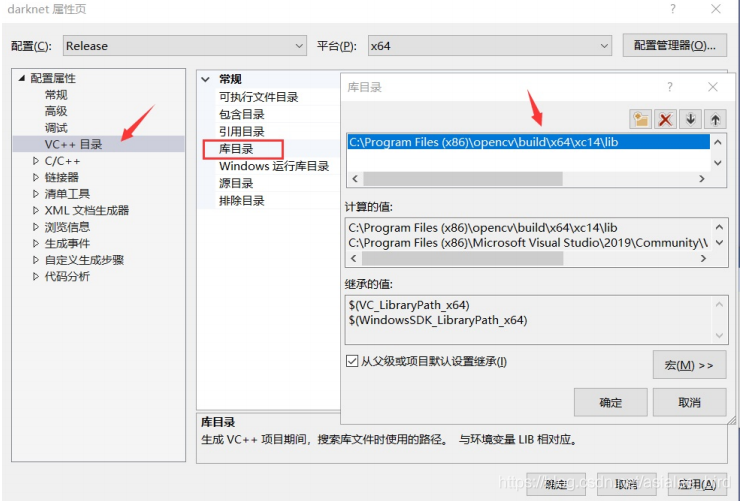
- 库目录:C:\Program Files (x86)\opencv\build\x64\xc14\lib ?
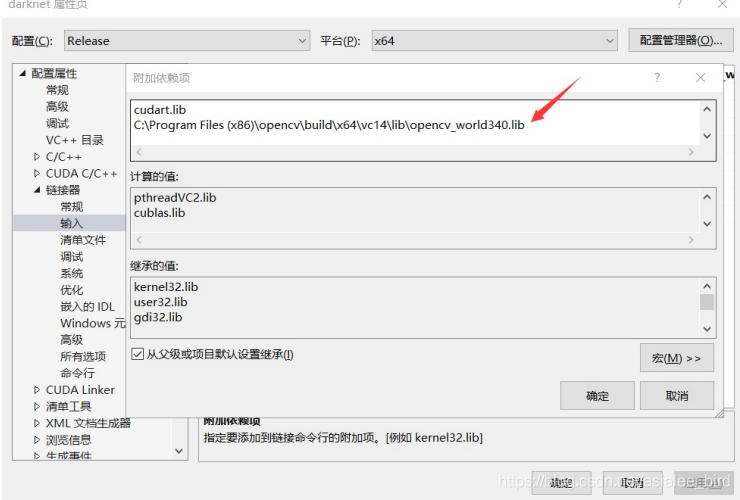
添加附加依赖项(按照自己的opencv3.4的路径):C:\Program Files (x86)\opencv\build\x64\vc14\lib\opencv_world340.lib
4、Visual Studio2019编译YOLOv4项目
点击“重新生成解决方案”。可能有下述错误:严重性 代码 说明 项目 文件 行 禁止显示状态 错误 MSB4019 找不到导入的项目“C:\Program Files(x86)\Microsoft Visual Studio\2019\Community\MSBuild\Microsoft\VC\v160\BuildCustomizations\CUDA 10.0.props”。请确认 Import 声明“C:\Program Files (x86)\Microsoft Visual Studio\2019\Community\MSBuild\Microsoft\VC\v160\BuildCustomizations\CUDA 10.0.props”中的表达式正确,且文件位于磁盘上。 darknet D:\darknet\build\darknet\darknet.vcxproj
解决方法:将D:\darknet\build\darknet\darknet.vcxproj中版本号进行修改如下


?仍然有错误时的解决方法:
- 将NVIDIA CUDA的安装程序(.exe文件)数据解压到一个指定文件夹中(最好是放在一个文件夹,解压后会出现很多文件,这样方便查找)
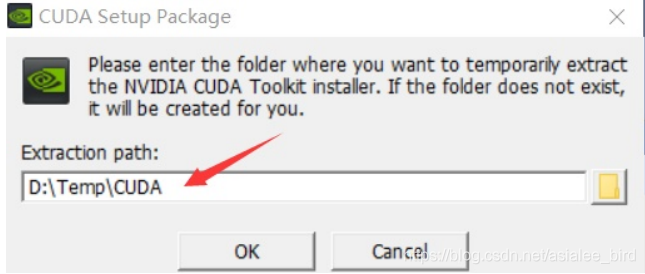
- "D:\Temp\CUDA\VisualStudioIntegration\extras\visual_studio_integration\MSBuildExtensions"下的文件直接拷贝到“C:\Program Files (x86)\Microsoft VisualStudio\2019\Community\MSBuild\Microsoft\VC\v160\BuildCustomizations”文件夹中。
- 再次点击重新生决方案,这时成解应该编译成功,并产生可执行文件D:\darknet\build\darknet\x64\darknet.exe

5、YOLOv4权重文件下载
yolov4.weight下载,拷贝权重文件到D:\darknet\build\darknet\x64
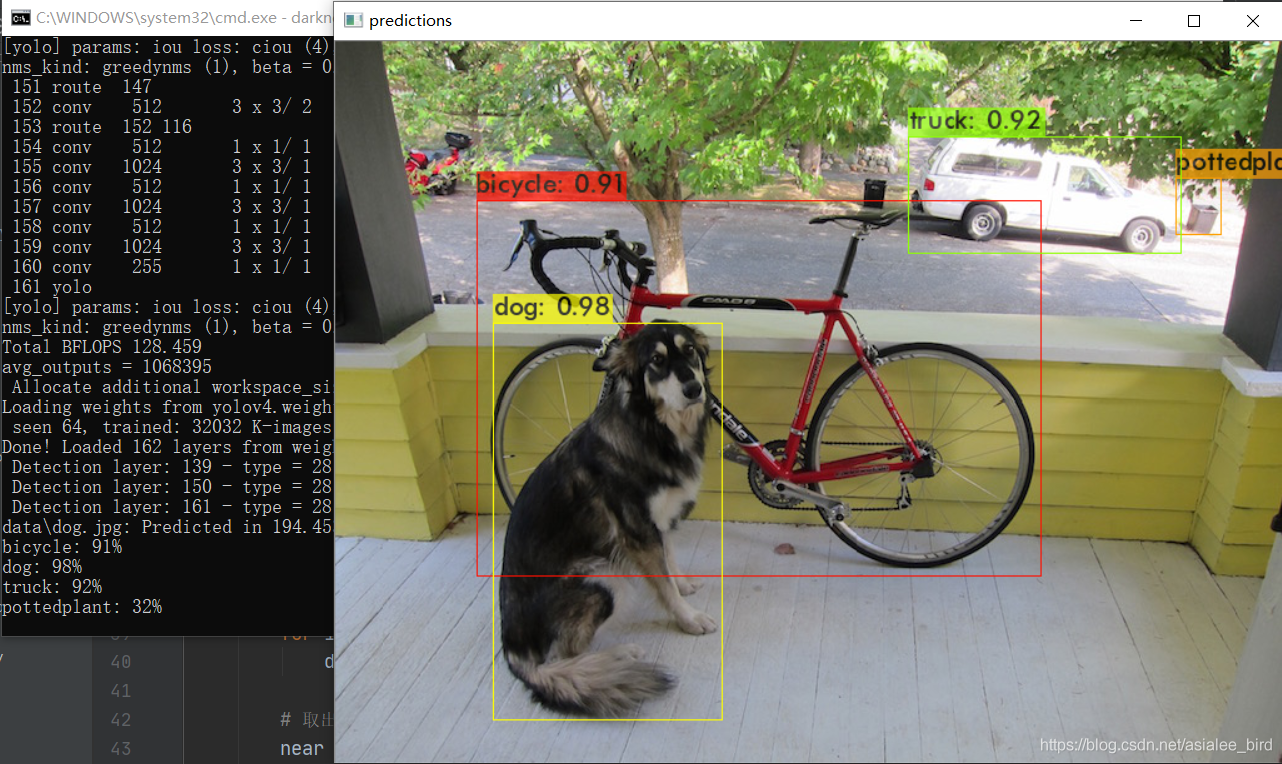
6、YOLOv4目标检测测试
(1)测试图片
在D:\darknet\build\darknet\x64\ 目录下执行:
darknet.exe detector test cfg\coco.data cfg\yolov4.cfg yolov4.weights data\dog.jpg
结果如下:
(2)测试视频
在D:\darknet\build\darknet\x64\ 目录下执行:
darknet.exe detector demo cfg\coco.data cfg\yolov4.cfg yolov4.weights data\driving.mp4
7、使用YOLOv4训练自己的数据集
(1)数据集准备
使用PASCAL VOC数据集的目录结构(建立文件夹层次为 D:\darknet\build\darknet\x64\VOCdevkit\ VOC2007):
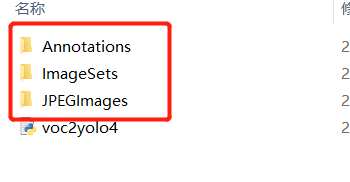
JPEGImages放所有的训练和测试图片;Annotations放所有的xml标记文件
(2)训练集和测试集生成
在D:\darknet\build\darknet\x64\目录下执行:python genfiles.py
在VOCdevkit \ VOC2007目录下可以看到生成了文件夹labels ,同时在darknet下生成了两个文件2007_train.txt和2007_test.txt。2007_train.txt和2007_test.txt分别给出了训练图片文件和测试图片文件的列表,含有每个图片的路径和文件名。
另外,在VOCdevkit \ VOC2007\ImageSets\Main目录下生产了两个文件test.txt和train.txt,分别给出了训练图片文件和测试图片文件的列表,但只含有每个图片的文件名(不含路径和扩展名)。labels下的文件是images文件夹下每一个图像的yolo格式的标注文件,这是由annotations的xml标注文件转换来的。
最终训练只需要:2007_train.txt,2007_test.txt,labels下的标注文件和 VOCdevkit\VOC2007\JPEGImages下的图像文件。
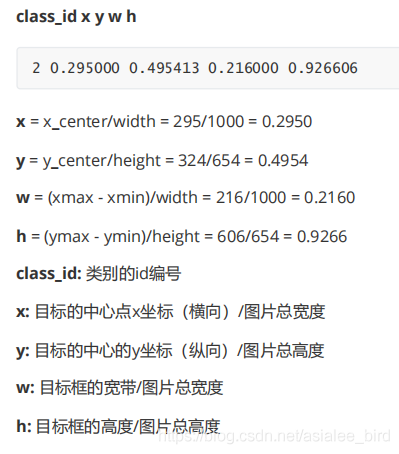
生成YOLO格式的txt标记文件内容如下:
genfiles.py文件如下:
import xml.etree.ElementTree as ET
import pickle
import os
from os import listdir, getcwd
from os.path import join
import random
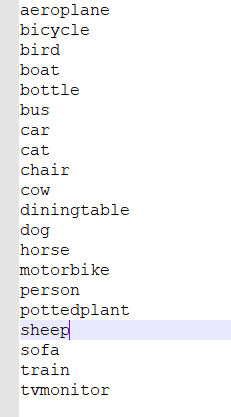
classes=["aeroplane", "bicycle", "bird", "boat", "bottle", "bus", "car", "cat", "chair", "cow", "diningtable", "dog", "horse", "motorbike", "person", "pottedplant", "sheep", "sofa", "train", "tvmonitor"]
def clear_hidden_files(path):
dir_list = os.listdir(path)
for i in dir_list:
abspath = os.path.join(os.path.abspath(path), i)
if os.path.isfile(abspath):
if i.startswith("._"):
os.remove(abspath)
else:
clear_hidden_files(abspath)
def convert(size, box):
dw = 1./size[0]
dh = 1./size[1]
x = (box[0] + box[1])/2.0
y = (box[2] + box[3])/2.0
w = box[1] - box[0]
h = box[3] - box[2]
x = x*dw
w = w*dw
y = y*dh
h = h*dh
return (x,y,w,h)
def convert_annotation(image_id):
in_file = open('VOCdevkit\VOC2007\Annotations\%s.xml' %image_id)
out_file = open('VOCdevkit\VOC2007\labels\%s.txt' %image_id, 'w')
tree=ET.parse(in_file)
root = tree.getroot()
size = root.find('size')
w = int(size.find('width').text)
h = int(size.find('height').text)
for obj in root.iter('object'):
difficult = obj.find('difficult').text
cls = obj.find('name').text
if cls not in classes or int(difficult) == 1:
continue
cls_id = classes.index(cls)
xmlbox = obj.find('bndbox')
b = (float(xmlbox.find('xmin').text), float(xmlbox.find('xmax').text), float(xmlbox.find('ymin').text), float(xmlbox.find('ymax').text))
bb = convert((w,h), b)
out_file.write(str(cls_id) + " " + " ".join([str(a) for a in bb]) + '\n')
in_file.close()
out_file.close()
wd = os.getcwd()
wd = os.getcwd()
work_sapce_dir = os.path.join(wd, "VOCdevkit\\")
if not os.path.isdir(work_sapce_dir):
os.mkdir(work_sapce_dir)
work_sapce_dir = os.path.join(work_sapce_dir, "VOC2007\\")
if not os.path.isdir(work_sapce_dir):
os.mkdir(work_sapce_dir)
annotation_dir = os.path.join(work_sapce_dir, "Annotations\\")
if not os.path.isdir(annotation_dir):
os.mkdir(annotation_dir)
clear_hidden_files(annotation_dir)
image_dir = os.path.join(work_sapce_dir, "JPEGImages\\")
if not os.path.isdir(image_dir):
os.mkdir(image_dir)
clear_hidden_files(image_dir)
VOC_file_dir = os.path.join(work_sapce_dir, "ImageSets\\")
if not os.path.isdir(VOC_file_dir):
os.mkdir(VOC_file_dir)
VOC_file_dir = os.path.join(VOC_file_dir, "Main\\")
if not os.path.isdir(VOC_file_dir):
os.mkdir(VOC_file_dir)
train_file = open(os.path.join(wd, "2007_train.txt"), 'w')
test_file = open(os.path.join(wd, "2007_test.txt"), 'w')
train_file.close()
test_file.close()
VOC_train_file = open(os.path.join(work_sapce_dir, "ImageSets\\Main\\train.txt"), 'w')
VOC_test_file = open(os.path.join(work_sapce_dir, "ImageSets\\Main\\test.txt"), 'w')
VOC_train_file.close()
VOC_test_file.close()
if not os.path.exists('VOCdevkit\\VOC2007\\labels'):
os.makedirs('VOCdevkit\\VOC2007\\labels')
train_file = open(os.path.join(wd, "2007_train.txt"), 'a')
test_file = open(os.path.join(wd, "2007_test.txt"), 'a')
VOC_train_file = open(os.path.join(work_sapce_dir, "ImageSets\\Main\\train.txt"), 'a')
VOC_test_file = open(os.path.join(work_sapce_dir, "ImageSets\\Main\\test.txt"), 'a')
list = os.listdir(image_dir) # list image files
probo = random.randint(1, 100)
print("Probobility: %d" % probo)
for i in range(0,len(list)):
path = os.path.join(image_dir,list[i])
if os.path.isfile(path):
image_path = image_dir + list[i]
voc_path = list[i]
(nameWithoutExtention, extention) = os.path.splitext(os.path.basename(image_path))
(voc_nameWithoutExtention, voc_extention) = os.path.splitext(os.path.basename(voc_path))
annotation_name = nameWithoutExtention + '.xml'
annotation_path = os.path.join(annotation_dir, annotation_name)
probo = random.randint(1, 100)
print("Probobility: %d" % probo)
if(probo < 75):
if os.path.exists(annotation_path):
train_file.write(image_path + '\n')
VOC_train_file.write(voc_nameWithoutExtention + '\n')
convert_annotation(nameWithoutExtention)
else:
if os.path.exists(annotation_path):
test_file.write(image_path + '\n')
VOC_test_file.write(voc_nameWithoutExtention + '\n')
convert_annotation(nameWithoutExtention)
train_file.close()
test_file.close()
VOC_train_file.close()
VOC_test_file.close()
(3)修改配置文件
- 新建data\voc.names文件,该文件内容存放数据标签名,可以复制data\voc.names再根据自己情况的修改(修改成自己的分类);可以重新命名等。
- ?新建 data\voc.data文件,可以复制data\voc.data再根据自己情况的修改;可以重新命等。
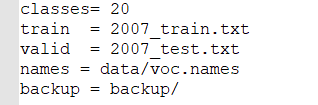
classes = N ,N为自己的分类数量;train 训练集完整路径列表;valid 测试集完整路径列表;names = data/voc.names? 类别文件;backup = backup/ 训练结果保存在darknet/backup/目录下。
- 新建cfg\yolov4-voc.cfg,可以复制cfg\yolov4-custom.cfg再根据自己情况的修改;可以重新命名等。
yolov4-voc.cfg文件参数说明:
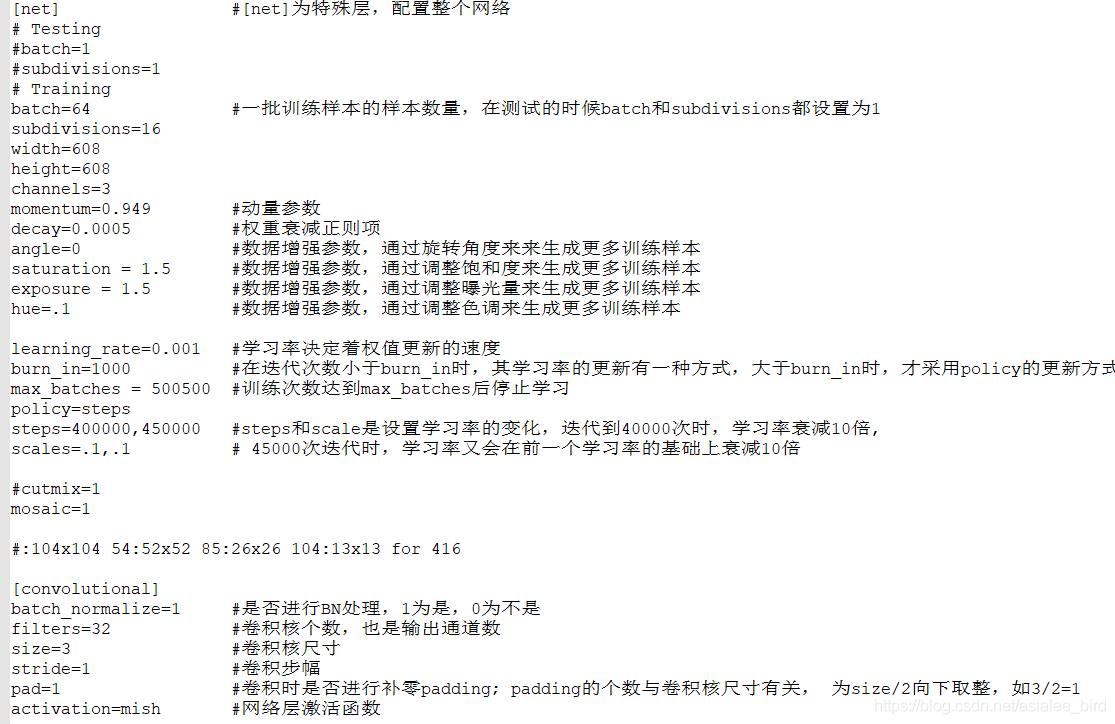

- batch:?每一次迭代送到网络的图片数量,也叫批数量。增大这个可以让网络在较少的迭代次数内完成一个epoch。在固定最大迭代次数的前提下,增加batch会延长训练时间,但会更好的寻找到梯度下降的方向。如果你显存够大,可以适当增大这个值来提高内存利用率。这个值是需要大家不断尝试选取的,过小的话会让训练不够收敛,过大会陷入局部最优。
- subdivision:这个参数它会让你的每一个batch不是一下子都丢到网络里。而是分成subdivision对应数字的份数,一份一份的跑完后,在一起打包算作完成一次iteration。这样会降低对显存的占用情况。如果设置这个参数为1的话就是一次性把所有batch的图片都丢到网络里,如果为2的话就是一次丢一半。(subdivisions=8 ,如果显存溢出改为16,32或64)
- angle:图片旋转角度,这个用来增强训练效果的。从本质上来说,就是通过旋转图片来变相的增加训练样本集。
- saturation,exposure,hue:饱和度,曝光度,色调,这些都是为了增强训练效果用的。
- learning_rate:学习率,训练发散的话可以降低学习率。学习遇到瓶颈,loss不变的话也减低学习率。
- max_batches:?最大迭代次数。
- policy:学习策略,一般都是step这种步进式。
- step,scales:这两个是组合一起的,举个例子:learn_rate: 0.001, step:100,25000,35000?? scales: 10, .1, .1 这组数据的意思就是在0-100次iteration期间learning rate为原始0.001,在100-25000次iteration期间learning rate为原始的10倍0.01,在25000-35000次iteration期间learning rate为当前值的0.1倍,就是0.001, 在35000到最大iteration期间使用learning rate为当前值的0.1倍,就是0.0001。随着iteration增加,降低学习率可以是模型更有效的学习,也就是更好的降低train loss。
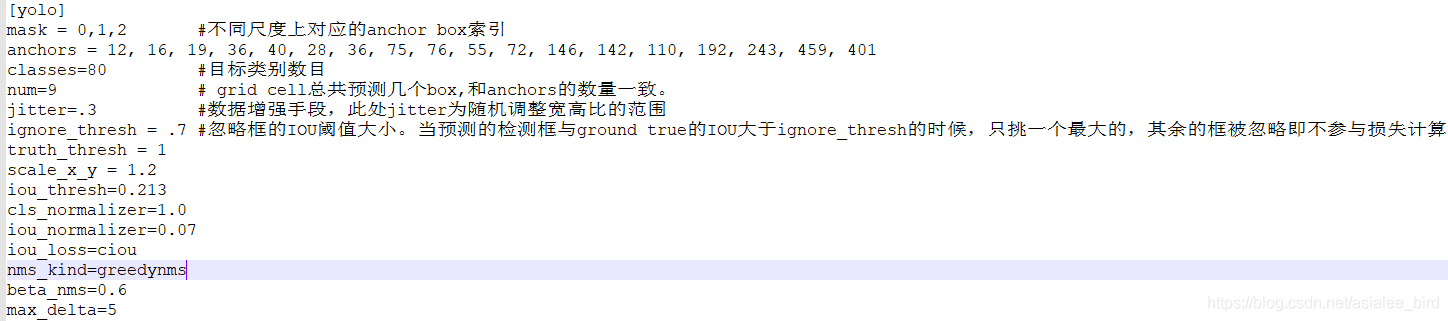
在cfg\yolov4-voc.cfg文件中,三个yolo层和各自前面的convolutional层的参数需要修改:filters=num╳(classes+5),5的意义是4个坐标加一个置信率num表示YOLO中每个cell预测的框的个数,yolo层中的classes为类别,YOLOV3中为3。此 处 的 值 要 根 据 自 己 的 数 据 集 进 行 更 改 , 例 如 识 别 4 个 类 别 , 则 :filters=3 ╳(4+5)=27。
(4)使用YOLOv4进行训练
下载权重文件:yolov4.conv.137,放置在D:\darknet\build\darknet\x64目录下这里的训练使用迁移学习,所以下载的yolov4在coco数据集上的预训练权重文件(不含全连接层)
训练网络(如需要显示训练过程的map变化,在命令末尾加-map):
darknet.exe detector train data\voc.data cfg\yolov4.cfg yolov4.conv.137 -map
网络训练建议:
- batch=16
- subdivisions=8 (如果显存溢出改为16,64)
- 把max_batches设置为 (classes*2000);但最小为4000。例如如果训练3个目标类别,max_batches=6000
- 把steps改为max_batches的80% and 90%;例如steps=4800, 5400。
- 为增加网络分辨率可增大height和width的值,但必须是32的倍数 (height=608, width=608 or 32的整数倍) 。这有助于提高检测精度。
(5)mAP性能统计
统计 mAP@IoU=0.50:
darknet.exe detector map data\voc.data cfg\yolov4-test.cfg backup\yolov4.weights
统计 mAP@IoU=0.75:
darknet.exe detector map data\voc.data cfg\yolov4-test.cfg backup\yolov4.weights -iou_thresh 0.75
8、Anchor Box先验框聚类分析与修改
使用k-means聚类获得自己数据集的先验框大小:
darknet.exe detector calc_anchors data\voc.data -num_of_clusters 9 -width 608 -height 608
D:\darknet\build\darknet\x64目录下生成anchors.txt文件,修改cfg文件中的先验框大小,重新训练和测试
二、Linux环境下的YOLOv4目标检测
1、环境配置
环境准备:Ubuntu16.04、CUDA10.1、cuDNN 7.65、OpenCV 3.4
opencv安装可以基于源码,可以使用命令安装:apt-get install libopencv-dev
?
2、YOLOv4下载和编译
- 下载darknet:git clone https://github.com/AlexeyAB/darknet.git
- cd darknet
- make #直接make则使用的是darknet原始配置(使用CPU)
- 如果使用GPU和OpenCV,则将Makefile文件中的对应项改为1,然后再执行make命令?

- 最后,在终端输入:./darknet
- 出现以下输出则说明安装成功:usage: ./darknet <function>
3、测试图片
测试单张图片:
./darknet detect cfg/yolov4.cfg yolov4.weights data/dog.jpg
测试多张图片(根据提示输入图片路径):?
./darknet detect cfg/yolov4.cfg yolov4.weights
三、提高YOLOv4目标检测性能的技巧
1、YOLOv4训练前的改善技巧
- 增大.cfg文件中的网络分辨率(height=608, width=608或任何32的倍数)有助于提高检测精度。
- 检查要检测的每个目标在数据集中都标注了标签。数据集中的任何目标都要有标签,数据集中如果有错误的标签也会导致训练出问题。
- 得到的损失函数很高并且mAP很低,训练出错了吗?在训练命令末尾使用-show_imgs 标志来运行训练,你是否能看到有正确的边界预测框的目标(在Windows的窗口或者aug_...jpg)?如果没有,训练是发生错误了。
- 对于要检测的每个目标,训练集中必须至少有一个相似的目标,且它们具有大致相同的形状:形状、物体的侧面、相对大小、旋转角度、倾斜度、照明度。 理想的是训练集应包含目标的不同图像:比例、旋转、照明、不同侧面、不同背景。每类图片最好有2000张不同的图像,并且训练的迭代次数(iterations)设置为2000×classes以上(最少为4000)。
- 训练数据集最好包含有不想检测的未标注物体的图像-即无边界框的负样本(空 的.txt文件)。并且负样本图像与带有物体的图像大致一样多。
- 如果要对每个图像中的大量目标进行训练,请在cfg文件的最后一个[yolo]层中添加参数max = 200或更大的值 。
- 为了使检测到的边界框更准确,可以向每个[yolo]层添加3个参数ignore_thresh = .9 iou_normalizer = 0.5 iou_loss = giou并进行训练,它将增加mAP@0.9,但降低mAP@0.5。
- 从cfg文件重新计算数据集的宽度和高度锚框(聚类分析):darknet detector calc_anchors data / obj.data -num_of_clusters 9 -width 416 -height 416然后在cfg文件的3个[yolo]图层中的每个层中设置9个锚框。 但是,你应该为每个[yolo]层更改anchor masks =的索引。 同样,你应该在每个[yolo]层之前更改filters=(classes + 5)*<number of mask>。 如果许多计算出的锚不适合在适当的层下,则只需尝试使用所有默认锚框即可。
2、YOLOv4训练后的改善技巧
- 通过在.cfg文件中设置(height=608 and width=608)或(height=832 and width=832)或(任何32的倍数)来提高网络分辨率。这可以提高精度并可以检测到小目标。
- 不必再次训练网络,只需使用已经针对416x416分辨率进行训练的权重文件即可,但是要获得更高的准确性,应该使用更高分辨率的608x608或832x832进行训练,请注意:如果发生显存溢出错误,在.cfg 文件应该增加subdivisions=16, 32 or 64 (batch=64时)。
?
?
?
?
cs