1. 最简单案例(静态添加方式)
旨在体验流程。在一个Activity中添加左右两个Fragment。
left_fragment.xml布局文件:
<?xml version="1.0" encoding="utf-8"?>
<LinearLayout xmlns:android="http://schemas.android.com/apk/res/android"
    android:orientation="vertical"
    android:layout_width="match_parent"
    android:layout_height="match_parent"
    android:background="@color/teal_700"
    >
    <Button
        android:text="left"
        android:layout_width="wrap_content"
        android:layout_height="wrap_content"
        android:textColor="@color/white"
        />
</LinearLayout>
right_fragment.xml布局文件:
<?xml version="1.0" encoding="utf-8"?>
<LinearLayout xmlns:android="http://schemas.android.com/apk/res/android"
    android:orientation="vertical"
    android:layout_width="match_parent"
    android:layout_height="match_parent"
    >
    <Button
        android:text="right"
        android:layout_width="wrap_content"
        android:layout_height="wrap_content"
        />
</LinearLayout>
然后编写各自对应的Fragment子类即可。
LeftFragment.java文件:
public class LeftFragment  extends Fragment {

    @Nullable
    @Override
    public View onCreateView(@NonNull LayoutInflater inflater,
                             @Nullable ViewGroup container,
                             @Nullable Bundle savedInstanceState) {
        View view = inflater.inflate(R.layout.left_fragment, container, false);
        return view;
    }
}
类似的添加RightFragment.java类文件。至于为什么是复写onCreateView方法,这就涉及到fragment和activity的生命周期对比,简单的图示如下:

上图来源博客:Activity和Fragment生命周期
观察可以知道,其实只要在fragment的onStart之前均可,但是我们看下onActivityCreated方法:
public void onActivityCreated(@Nullable Bundle savedInstanceState) {
    super.onActivityCreated(savedInstanceState);
}
并没有提供可以用于布局实例化的LayoutInflater。而在onCreateView中却提供了这些东西。
然后在Activity.java的布局文件中使用fragment标签的android:name来进行关联:
<?xml version="1.0" encoding="utf-8"?>
<LinearLayout xmlns:android="http://schemas.android.com/apk/res/android"
    xmlns:tools="http://schemas.android.com/tools"
    android:layout_width="match_parent"
    android:layout_height="match_parent"
    android:orientation="horizontal"
    tools:context=".TestActivity">

    <fragment
        android:id="@+id/id_leftfragment"
        android:layout_width="0dp"
        android:layout_height="match_parent"
        android:layout_weight="1"
        android:name="com.weizu.send_message.fragments.LeftFragment"/>

    <fragment
        android:id="@+id/id_rightfragment"
        android:layout_width="0dp"
        android:layout_height="match_parent"
        android:layout_weight="1"
        android:name="com.weizu.send_message.fragments.RightFragment" />

</LinearLayout>
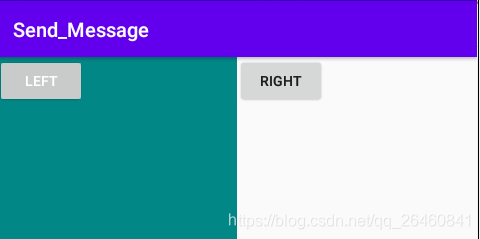
这里LinearLayout的布局方向设置为水平horizontal,且使用android:layout_weight时候,需要讲对应的自生动态调整方向设置为0dp。最终效果如下:
2. 最简单案例(动态添加方式)
前面介绍了静态添加方式,这里来使用FragmentLayout来实现代码里面的动态添加。还是上面的案例,我们对右边的fragment不在xml布局文件中关联,修改Activity.java的布局文件如下:
<LinearLayout xmlns:android="http://schemas.android.com/apk/res/android"
    xmlns:tools="http://schemas.android.com/tools"
    android:layout_width="match_parent"
    android:layout_height="match_parent"
    android:orientation="horizontal"
    tools:context=".TestActivity">

    <fragment
        android:id="@+id/id_leftfragment"
        android:layout_width="0dp"
        android:layout_height="match_parent"
        android:layout_weight="1"
        android:name="com.weizu.send_message.fragments.LeftFragment"/>

    <FrameLayout
        android:id="@+id/id_rightfragment"
        android:layout_width="0dp"
        android:layout_height="match_parent"
        android:layout_weight="1"
        >
    </FrameLayout>

</LinearLayout>
然后在Activity的onCreate中操作:
protected void onCreate(Bundle savedInstanceState) {
    super.onCreate(savedInstanceState);
    setContentView(R.layout.activity_test);

    FrameLayout frameLayout = findViewById(R.id.id_rightfragment);
    Fragment fragment = new RightFragment();
    FragmentManager manager = getSupportFragmentManager();
    FragmentTransaction transaction = manager.beginTransaction();
    transaction.replace(R.id.id_rightfragment, fragment);
    transaction.commit();
}
上面使用布局管理器FragmentManager来进行事物提交,使用了replace和commit。
3. 在Fragment中实现返回栈
此时如果如果点击返回按钮,程序会直接退出,如果我们希望按下返回键的时候,可以回到上一个Fragment,应该如何实现?
只需要新增:
transaction.addToBackStack(null);
即可实现。
那么,这里就有一个常见的面试问题:
在Activity中调用replace在addToBackStack方法使用了后的生命周期:
- 新替换的
Fragment没有在BackStack中,onAttach->onCreate->onViewCreate->onActivityCreated->onStart->onResume; - 新替换的
Fragment在BackStack中,onCreateView->onViewCreated->onActivityCreated->onStart->onResume; - 被替换的
Fragment:onPause->onStop->onDestoryView->onDestory->onDetach;
结合上面的对应生命周期函数图,可以理解,也就是如果已经添加到了BackStack那么就不用在onCreate。注意到onCreate和onDestory分别处于正二和倒二位置。
4. 动态加载布局技巧
我们希望程序能够根据设备屏幕的分辨率大小,在运行时候自己决定加载哪个布局文件。
4.1 使用限定符
为了适应大屏设备,这里定义一个单页模式和双页模式。
activity_test.xml文件:
<?xml version="1.0" encoding="utf-8"?>
<LinearLayout xmlns:android="http://schemas.android.com/apk/res/android"
    xmlns:tools="http://schemas.android.com/tools"
    android:layout_width="match_parent"
    android:layout_height="match_parent"
    android:orientation="horizontal"
    tools:context=".TestActivity">

    <fragment
        android:id="@+id/id_leftfragment"
        android:layout_width="0dp"
        android:layout_height="match_parent"
        android:layout_weight="1"
        android:name="com.weizu.send_message.fragments.LeftFragment"/>

</LinearLayout>
然后在res目录下新建一个文件夹layout-large,然后创建一个activity_test.xml文件:
<?xml version="1.0" encoding="utf-8"?>
<LinearLayout xmlns:android="http://schemas.android.com/apk/res/android"
    xmlns:tools="http://schemas.android.com/tools"
    android:layout_width="match_parent"
    android:layout_height="match_parent"