NFS服务器设置
实验环境
| 主机类型 | 操作系统 | IP地址 |
|---|
| 服务端 | CentOS7 | 192.168.11.38 |
| 客户端 | CentOS7 | 192.168.11.2 |
1.实验环境准备----配置虚拟机网络类型(两台主机都要配置成一样的,仅主机或者桥接)

一、服务端配置NFS
1.查询是否安装NFS
[root@localhost ~]# rpm -qa nfs-utils ripcbind
2.如果没有,则安装
[root@localhost ~]# yum install -y nfs-utils rpcbind
3.创建共享目录及文件,在新建文件中写入“CSDN”,更改目录权限
[root@localhost ~]# mkdir /sharedata
[root@localhost ~]# chmod 777 /sharedata/
[root@localhost ~]# echo CSDN >> /sharedata/test.txt
4.修改配置文件
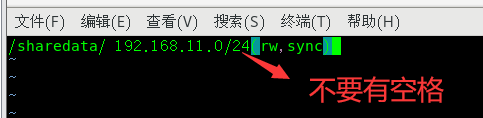
[root@localhost ~]# vim /etc/exports
添加以下内容/sharedata/ 192.168.11.0/24(rw,sync)
◆/sharedata ----指定共享目录信息
◆192.168.11.0/24 ----允许访问NFS的客户端IP地址段
◆(rw,sync) ----表示定义共享参数信息
rw 表示读写,对共享目录设置的权限
sync 同步,数据会先写入到NFS服务器内存中,会立刻同步到磁盘里面= =直接存储硬盘中
5.关闭防火墙
[root@localhost ~]# systemctl stop firewalld.service
6.启动rpcbind和nfs服务
[root@localhost ~]# systemctl start rpcbind.service
[root@localhost ~]# systemctl start nfs-server.service
7.rpcbind和nfs做开机启动
[root@localhost ~]# systemctl enable rpcbind.service
[root@localhost ~]# systemctl enable nfs-server.service

完整代码
[root@localhost ~]# rpm -qa nfs-utils ripcbind
[root@localhost ~]# yum install -y nfs-utils rpcbind
[root@localhost ~]# mkdir /sharedata
[root@localhost ~]# chmod 777 /sharedata/
[root@localhost ~]# echo CSDN >> /sharedata/test.txt
[root@localhost ~]# vim /etc/exports
[root@localhost ~]# systemctl stop firewalld.service
[root@localhost ~]# systemctl start rpcbind.service
[root@localhost ~]# systemctl start nfs-server.service
[root@localhost ~]# systemctl enable rpcbind.service
[root@localhost ~]# systemctl enable nfs-server.service
二、客户端配置NFS
1.同样查询是否安装NFS
[root@localhost ~]# rpm -qa nfs-utils ripcbind
2.如果没有,则安装
[root@localhost ~]# yum install -y nfs-utils rpcbind
3.挂载NFS
客户端在挂载NFS之前,我们需要先看一看服务端都共享了哪些目录,这需要使用showmount命令(这个命令是nfs-utils这个包所带的,所以安装nfs后才能使用)
(1)查看服务器端都共享了哪些目录
[root@localhost ~]# showmount -e 192.168.11.38

(2)客户端上挂载服务端的nfs(需先创建一个目录,用于挂载)
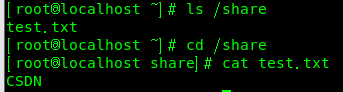
[root@localhost ~]# mkdir /share
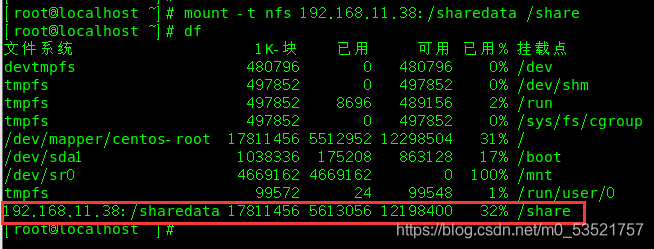
[root@localhost ~]# mount -t nfs 192.168.11.38:/sharedata /share
(3)查看是否挂载成功
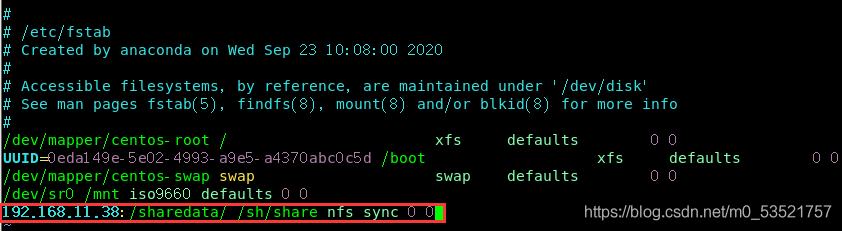
(4)如果要设置客户端启动时候就挂载NFS ,可以配置/etc/fstab添加以下内容
192.168.11.38:/sharedata/ /sh/share nfs sync 0 0
[root@localhost ~]# vim /etc/fstab
完整代码
[root@localhost ~]# rpm -qa nfs-utils ripcbind
[root@localhost ~]# yum install -y nfs-utils rpcbind
[root@localhost ~]# showmount -e 192.168.11.38
[root@localhost ~]# mkdir /share
[root@localhost ~]# mount -t nfs 192.168.11.38:/sharedata /share
三、exportfs命令
◆当改变/etc/exports配置文件后 ,不用重启nfs服务客户端直接用exportfs即可
◆它的常用选项为[-aruv]
-a:全部挂载或者卸载;
-r:重新挂载;
-u:卸载某一个目录;
-v :显示共享的目录;
1.在服务器端的配置文件/etc/exports添加一行信息
/sharedata1/ 192.168.11.0/24(rw,sync)(需先创建/sharedata1目录!)

2.在服务端使用exportfs -arv ,重新使配置文件生效

3.在客户端
[root@localhost ~]# showmount -e 192.168.11.38

今天的分享就到这里,大家有什么问题可以直接私信或者评论,博主肯定会回复的。希望大家指出我的不足之处,我们一起努力。创作不易,希望大家给个赞。
cs