SpringCloud-Config
SpringCloudConfig提供分布式配置中心,抽取各个服务的公共配置,并提供配置文件的热加载等功能。
一、引入依赖
<dependencies>
<dependency>
<groupId>org.springframework.cloud</groupId>
<artifactId>spring-cloud-config-server</artifactId>
</dependency>
<dependency>
<groupId>org.springframework.cloud</groupId>
<artifactId>spring-cloud-starter-netflix-eureka-client</artifactId>
</dependency>
<dependency>
<groupId>org.springframework.boot</groupId>
<artifactId>spring-boot-starter-actuator</artifactId>
</dependency>
</dependencies>
接着在启动类开启ConfigServer:
@SpringBootApplication
@EnableConfigServer
@EnableEurekaClient
public class ConfigServerApplication {
public static void main(String[] args) {
SpringApplication.run(MicroConfigServerApplication.class,args);
}
}
二、配置
主要看config的:
eureka.client.serviceUrl.defaultZone=http://admin:admin@localhost:10086/eureka/
spring.application.name=config-server
spring.cloud.config.server.git.uri=https://gitee.com/xxxx/config-repository
# 配置的根目录,因为我直接将配置文件放在仓库根目录,因此不需要指明根目录
#spring.cloud.config.server.git.search-paths=config
spring.cloud.config.server.git.username=xxx
spring.cloud.config.server.git.password=xxx
# 分支
spring.cloud.config.server.git.default-label=master
#本地缓存目录
spring.cloud.config.server.git.basedir=D:\\Documentation\\JAVA\\SpringCloud\\cache
#强制从GitHub配置中心中拉取配置信息,不走缓存
spring.cloud.config.server.git.force-pull=true
启动后,我们可以直接通过如下路径访问:
三、访问配置中心文件
/{application}/{profile}[/{label}]
/{application}-{profile}.yml
/{label}/{application}-{profile}.yml
/{application}-{profile}.properties
/{label}/{application}-{profile}.properties
application:应用名
profile:配置文件的版本,dev啊,prod啊,或是其他自定义的名字
label:就是配置中心的分支
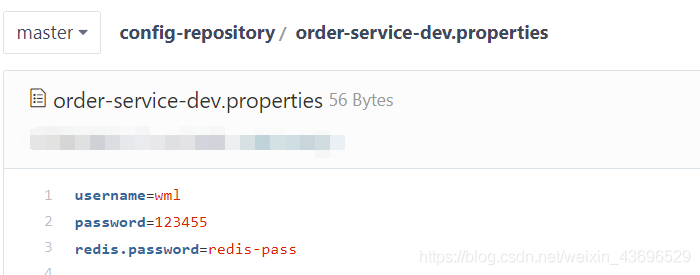
如下:

对应仓库的配置文件信息:
四、客户端配置
依赖和服务端一样。
然后配置如下:
# 环境
spring.cloud.config.profile=dev
# 分支
spring.cloud.config.label=master
# 单机下直接指定配置中心服务端地址
spring.cloud.config.uri=http://localhost:8085/
#configserver高可用配置
#开启configserver服务发现功能
spring.cloud.config.discovery.enabled=true
#服务发现的服务名称
spring.cloud.config.discovery.service-id=config-server
接着我们写一个获取配置中心的配置信息的接口:
@RestController
@RequestMapping("/config")
public class ConfigController {

    @Autowired
    private Environment environment;

    @Value("${password}")
    private String password;
    @Value("${redis.password}")
    private String redisPassword;

    @GetMapping("/info")
    public String info(){
        return "environment拿到的username:"+environment.getProperty("username")+"\n@Value拿到的password:"+password+"\nredis-pwd:"+redisPassword;
    }
}
我们可以直接通过Spring中的@Value注解或其他获取配置文件信息的方式,如Enviroment中获取配置信息。

如上,便从配置中心获取到了配置信息。
五、配置中心加密
配置中心一定会有许多密码相关的敏感信息,这时候为了安全就需要对其进行加密。
这里使用RSA加密:
进入jdk安装目录的bin目录。
keytool -genkeypair -alias config-server -keyalg RSA -keystore config-server.keystore -validity 365
执行如上命令会生成一个config-server.keystore文件,然后将该文件放到配置中心服务的resources目录下。
接着需要在pom.xml中将其引入:
<build>
<resources>
            <resource>
                <directory>src/main/resources</directory>
                <includes>
                    <include>**/*.properties</include>
                    <include>**/*.keystore</include>
                </includes>
                <filtering>false</filtering>
            </resource>
        </resources>
    </build>
然后在配置加密信息:
#加密配置
encrypt.key-store.location=config-server.keystore
encrypt.key-store.alias=config-server
encrypt.key-store.password=xiaoyunshi
encrypt.key-store.secret=xiaoyunshi
重新启动后,可以访问加密和解密的接口地址:
加密POST:http://localhost:8085/encrypt
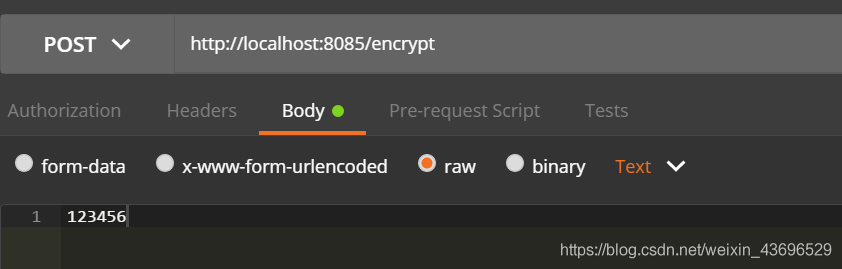
结果:
AQCWCc9qMW0Ae0XEzGy1OFIdchaG/6DnOG/7mPNXiUJuhk2UmoOfyqZoyrXW6+N7mE7kE5BrGQf1YNYjWhDSxTPtea/BTJ4Yl38yG5ENfudk3q6p7jmgNWcAjQRnMl5PFVhLY1vX8CNrKiXzj2YaIkIJWtEvUuMAYpuc2nLAUD0JColkdQ/eotRza5uHwC9Savz2DTRaNfBnbcAqVp5lQ+fb8GB892UAkKW9HfWGBB/eHyGPmHECwLxseZV0nuYiSJLgb3eZzTLsx6mgM02rUgiDgbP5H8Prl9mdgt3CSVhoqZx/AorC/+RfxPNT8UoO4RVc3opSJ6KsH2T+wlfkOZ6rPhZsKuFQmp4zf7Xh4C3ZQdb7s+CpisUCXjYaor7GcYw=
将上面的密文替换到仓库对应的配置属性:
并且要加上{cipher}前缀,这样服务端才会进行解密:
password={cipher}AQCWCc9qMW0Ae0XEzGy1OFIdchaG/6DnOG/7mPNXiUJuhk2UmoOfyqZoyrXW6+N7mE7kE5BrGQf1YNYjWhDSxTPtea/BTJ4Yl38yG5ENfudk3q6p7jmgNWcAjQRnMl5PFVhLY1vX8CNrKiXzj2YaIkIJWtEvUuMAYpuc2nLAUD0JColkdQ/eotRza5uHwC9Savz2DTRaNfBnbcAqVp5lQ+fb8GB892UAkKW9HfWGBB/eHyGPmHECwLxseZV0nuYiSJLgb3eZzTLsx6mgM02rUgiDgbP5H8Prl9mdgt3CSVhoqZx/AorC/+RfxPNT8UoO4RVc3opSJ6KsH2T+wlfkOZ6rPhZsKuFQmp4zf7Xh4C3ZQdb7s+CpisUCXjYaor7GcYw=
解密POST:http://localhost:8085/decrypt,post 请求

结果就是123456
刷新配置
接着可以调用
POST:http://localhost:8086/actuator/refresh对目标服务进行手动刷新。
但是这种方式刷新,只会让Environment方式获取的值为最新的,而@Value获取的仍是旧的:
我们将仓库中的username修改为zhangsan,将redis.password修改为aaa,然后调用上述接口:
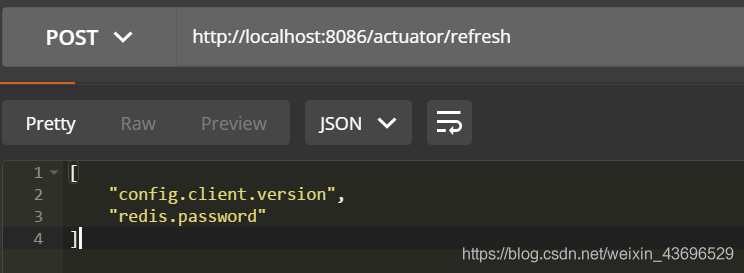
会返回修改的属性,这里因为我修改完username调用了一次刷新忘记截图又修改的redis.password属性再刷新,所以只显示了redis.password。
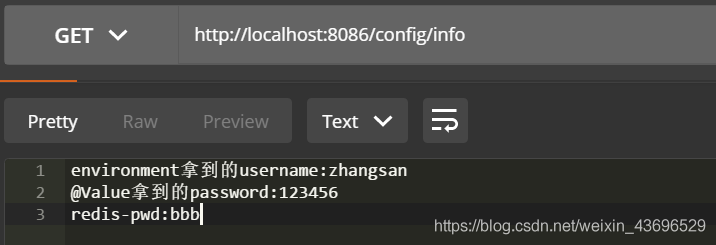
重新访问获取信息的接口:
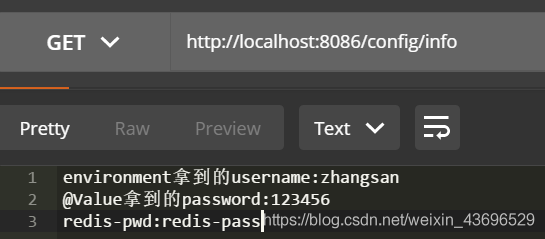
发现通过Environment获取的属性已经更新了。
而要想让使用@Value获取的属性也动态刷新,需要在类上添加@RefreshScope注解,我们将redis.password修改为bbb然后调用刷新接口,再获取信息:
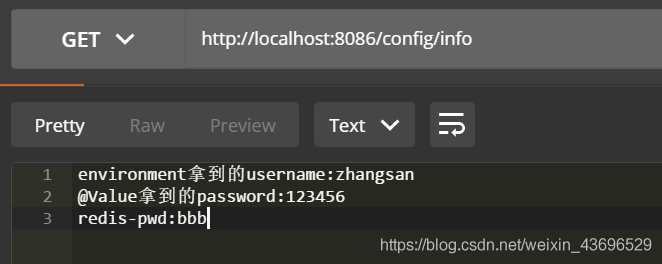
此时就可以获取到最新的信息了。
一个服务可以手动刷新,但如果服务非常多,手动刷新显然不可取,因此可以采用消息总线实现刷新功能。
消息总线实现刷新
消息总线,就可以理解为让所有服务订阅到总线,然后对任意一个服务调用刷新,那么所有订阅总线的服务都会收到消息进行刷新。
消息总线可借助RabbitMQ实现。
引入依赖:
 <dependency>
            <groupId>org.springframework.cloud</groupId>
            <artifactId>spring-cloud-starter-bus-amqp</artifactId>
        </dependency>
配置rabbitMQ:
spring.rabbitmq.host=xxx
spring.rabbitmq.port=5672
spring.rabbitmq.username=xiaoyunshi
spring.rabbitmq.password=xiaoyunshi
然后我们再将获取配置信息的ConfigController复制到另一个服务,该服务同样配置消息总线。并且将@RefreshScope去掉。
刷新接口为:POST:http://localhost:8086/actuator/bus-refresh
调用任意服务的该接口都可让所有订阅总线的服务配置刷新。
当前的信息为:
修改配置并调用刷新后:

拿到了修改后的值。
六、快速失败和重试
客户端启动时会去拉取服务端的配置,如果连接服务端失败,我们可以进行快速失败,而不用继续启动让Spring加载。
客户端配置如下:
spring.cloud.config.fail-fast=true
同时也可以借助spring-retry包实现重试机制:
依赖:
<dependency>
            <groupId>org.springframework.retry</groupId>
            <artifactId>spring-retry</artifactId>
        </dependency>
配置:
#默认重试的间隔时间,默认1000ms
spring.cloud.config.retry.initial-interval=1000
#下一间隔时间的乘数,默认是1.1
spring.cloud.config.retry.multiplier=1.1D
#最大间隔时间,最大2000ms
spring.cloud.config.retry.max-interval=2000
#最大重试次数,默认6次
spring.cloud.config.retry.max-attempts=6
cs