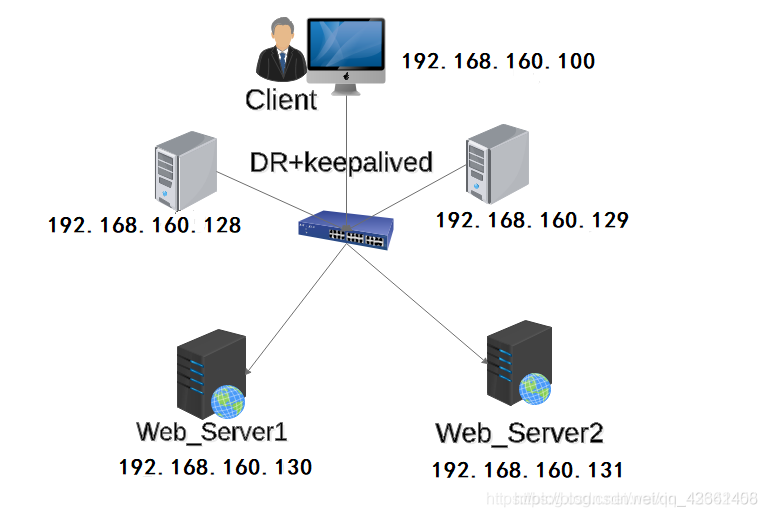
实验拓扑图:
第一步:设置两台web服务器,安装Apache或nginx等web服务器
systemctl stop firewalld
setenforce 0
yum install -y httpd
vim /var/www/html/index.html
this is web1
this is web2
第二步:LVS设置
两台LVS服务器(192.168.160.128 192.168.160.129)都设置 keepalived* ipvsadm
yum -y install keepalived* ipvsadm    //安装keepalived和lvs管理工具
modprobe ip_vs    //加载内核模块
cp /etc/keepalived/keepalived.conf /etc/keepalived/keepalived.conf_bak    //备份配置文件
LVS1
按照以下内容修改keepalived.conf 或 新建keepalived.conf文件将下面的内容复制进去
(keepalived.conf 文件所在位置:/etc/keepalived/)
global_defs {
router_id LVS_TEST
}
vrrp_instance VI_1 {
state MASTER
interface ens33
virtual_router_id 51
priority 101
advert_int 1
authentication {
auth_type PASS
auth_type 1234
}
virtual_ipaddress {
192.168.160.100/24
}
}
virtual_server 192.168.160.100 80 {
delay_loop 15
lb_algo rr
lb_kind DR
!persistence 60
persistence_timeout 0
protocol TCP
real_server 192.168.160.131 80 {
weight 1
TCP_CHECK {
connect_port 80
connect_timeout 3
nb_get_retry 3
delay_before_retry 4
}
}
real_server 192.168.160.130 80 {
weight 1
TCP_CHECK {
connect_port 80
connect_timeout 3
nb_get_retry 3
delay_before_retry 4
}
}
}
LVS2
按照以下内容修改keepalived.conf 或 新建keepalived.conf文件将下面的内容复制进去,基本和LVS类似只需要修改以下内容(keepalived.conf 文件所在位置:/etc/keepalived/)
global_defs {
router_id LVS_TEST02
}
vrrp_instance VI_1 {
state BACKUP
interface ens33
virtual_router_id 51
priority 99
advert_int 1
authentication {
auth_type PASS
auth_type 1234
}
virtual_ipaddress {
192.168.160.100/24
}
}
virtual_server 192.168.160.100 80 {
delay_loop 15
lb_algo rr
lb_kind DR
persistence_timeout 0
!persistence 60
protocol TCP
real_server 192.168.160.130 80 {
weight 1
TCP_CHECK {
connect_port 80
connect_timeout 3
nb_get_retry 3
delay_before_retry 4
}
}
real_server 192.168.160.131 80 {
weight 1
TCP_CHECK {
connect_port 80
connect_timeout 3
nb_get_retry 3
delay_before_retry 4
}
}
}
LVS1和LVS2配置完keepalived.conf,后进行查看配置是否成功
ip a
两个web服务器上绑定VIP
ip addr add 192.168.160.100/32 dev lo
ip a
修改完毕后启动
systemctl restart keepalived
测试:
浏览器访问 192.168.160.100
进行多次访问,出现的内容是web1服务器的index.html内容 或者 web2服务器 的index.html内容
参考链接:
LVS之DR、NAT、TUN三种模式快速搭建
LVS+Keepalive双机热备
cs