Spring Cloud Config简介:Spring Cloud Config为分布式系统提供了服务端和客户端用于支持外部配置。使用Config Server可以在所有环境中管理应用程序的外部属性。客户端和服务器上的概念映射与Spring中的Environment和PropertySource抽象相同,因此它们非常适合Spring应用程序,但可以与任何语言运行的任何应用程序一起使用。当应用程序通过部署管道从开发到测试并进入生产时,可以管理这些环境之间的配置,并确保应用程序具有迁移时需要运行的所有内容。它默认的服务器存储后端实现使用git,因此可以轻松支持配置环境的标签版本,并且可以访问各种用于管理内容的工具。基于spring配置可以很方便的实现扩展。
本文主要对Spring Cloud Config的基本使用进行简单总结,其中SpringBoot使用的2.2.2.RELEASE版本,SpringCloud使用的Hoxton.SR1版本。这里将沿用SpringCloud 服务注册与发现Eureka Hoxton版本的eureka-server作为注册中心。在搭建Config配置中心之前需要先准备好测试用的Git仓库。
一、准备Git仓库
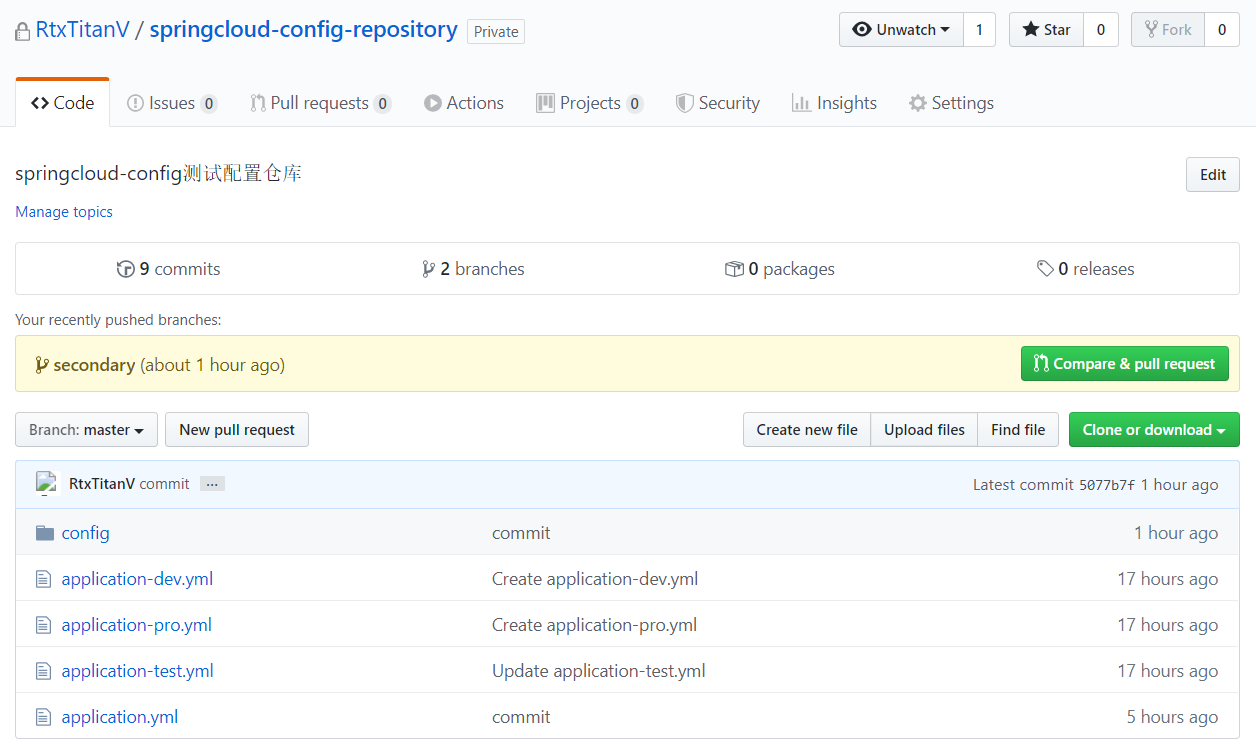
1.Git仓库结构
2.master分支配置
application.yml :
application:
  name: master-config
application-dev.yml:
application:
  name: master-config-dev
application-test.yml :
application:
  name: master-config-test
application-pro.yml :
application:
  name: master-config-pro
3.secondary分支配置
application.yml :
application:
  name: secondary-config
application-dev.yml:
application:
  name: secondary-config-dev
application-test.yml :
application:
  name: secondary-config-test
application-pro.yml :
application:
  name: secondary-config-pro
二、创建Config服务端
通过Maven新建一个名为spring-cloud-config-server的项目。
1.引入依赖
SpringBoot和SpringCloud依赖这里就不列出来了,还需引入以下依赖:
<dependency>
<groupId>org.springframework.cloud</groupId>
<artifactId>spring-cloud-config-server</artifactId>
</dependency>
<dependency>
<groupId>org.springframework.cloud</groupId>
<artifactId>spring-cloud-starter-netflix-eureka-client</artifactId>
</dependency>
<dependency>
<groupId>org.springframework.boot</groupId>
<artifactId>spring-boot-starter-security</artifactId>
</dependency>
2.主启动类
package com.rtxtitanv;
import org.springframework.boot.SpringApplication;
import org.springframework.boot.autoconfigure.SpringBootApplication;
import org.springframework.cloud.config.server.EnableConfigServer;
import org.springframework.cloud.netflix.eureka.EnableEurekaClient;
@EnableConfigServer
@EnableEurekaClient
@SpringBootApplication
public class ConfigServerApplication {
public static void main(String[] args) {
SpringApplication.run(ConfigServerApplication.class, args);
}
}
@EnableConfigServer:启用配置中心。
3.编写配置文件
在application.yml中进行如下配置:
server:
port: ${PORT:9400}
spring:
application:
name: config-server
security:
user:
name: rtxtitanv
password: rtxtitanv
cloud:
config:
server:
git:
uri: https://github.com/RtxTitanV/springcloud-config-repository.git
username: rtxtitanv
password: *********
clone-on-start: true
force-pull: true
eureka:
client:
register-with-eureka: true
fetch-registry: true
service-url:
defaultZone: http://rtxtitanv:rtxtitanv@eureka-server-01:8001/eureka/,http://rtxtitanv:rtxtitanv@eureka-server-02:8002/eureka/,http://rtxtitanv:rtxtitanv@eureka-server-03:8003/eureka/
instance:
prefer-ip-address: true
instance-id: ${spring.application.name}:${spring.cloud.client.ip-address}:${server.port}
lease-renewal-interval-in-seconds: 20
lease-expiration-duration-in-seconds: 60
4.通过Config服务端获取配置信息
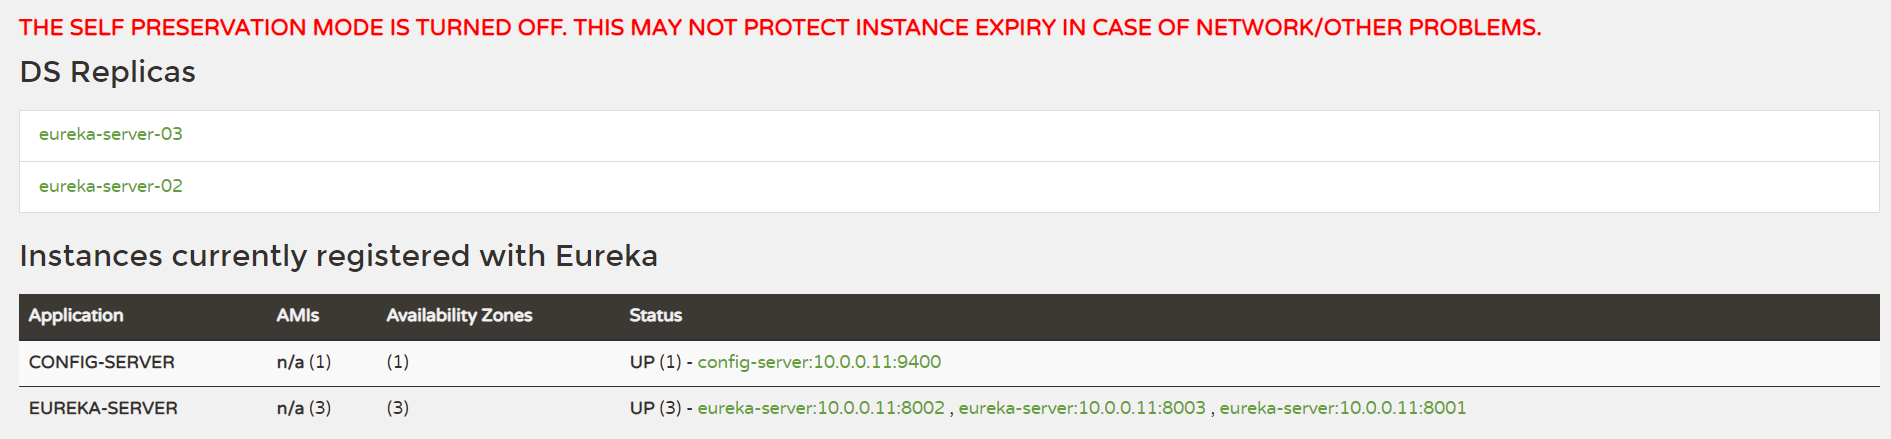
IDEA启动eureka-server集群和config-server,访问注册中心,下图为服务注册信息:
访问配置信息的URL与配置文件的映射关系如下:
# 获取配置信息,{label}可省略,省略后默认获取master分支配置信息
/{application}/{profile}[/{label}]
# 获取master分支配置文件信息
/{application}-{profile}.yml
# 获取配置文件信息
/{label}/{application}-{profile}.yml
# 获取master分支配置文件信息
/{application}-{profile}.properties
# 获取配置文件信息
/{label}/{application}-{profile}.properties
application:为SpringApplication中spring.config.name的注入,没配置spring.config.name的常规情况为spring.application.name,对应Git仓库中文件名的前缀。
profile:环境名称,对应配置文件中的spring.cloud.config.profile。
label:Git仓库的分支名称,对应配置文件中的spring.cloud.config.label,默认为master。
访问http://localhost:9400/application/dev/master获取master分支dev环境配置信息,由于config-server添加了security安全认证,所以需输入用户名和密码,下图为配置信息:

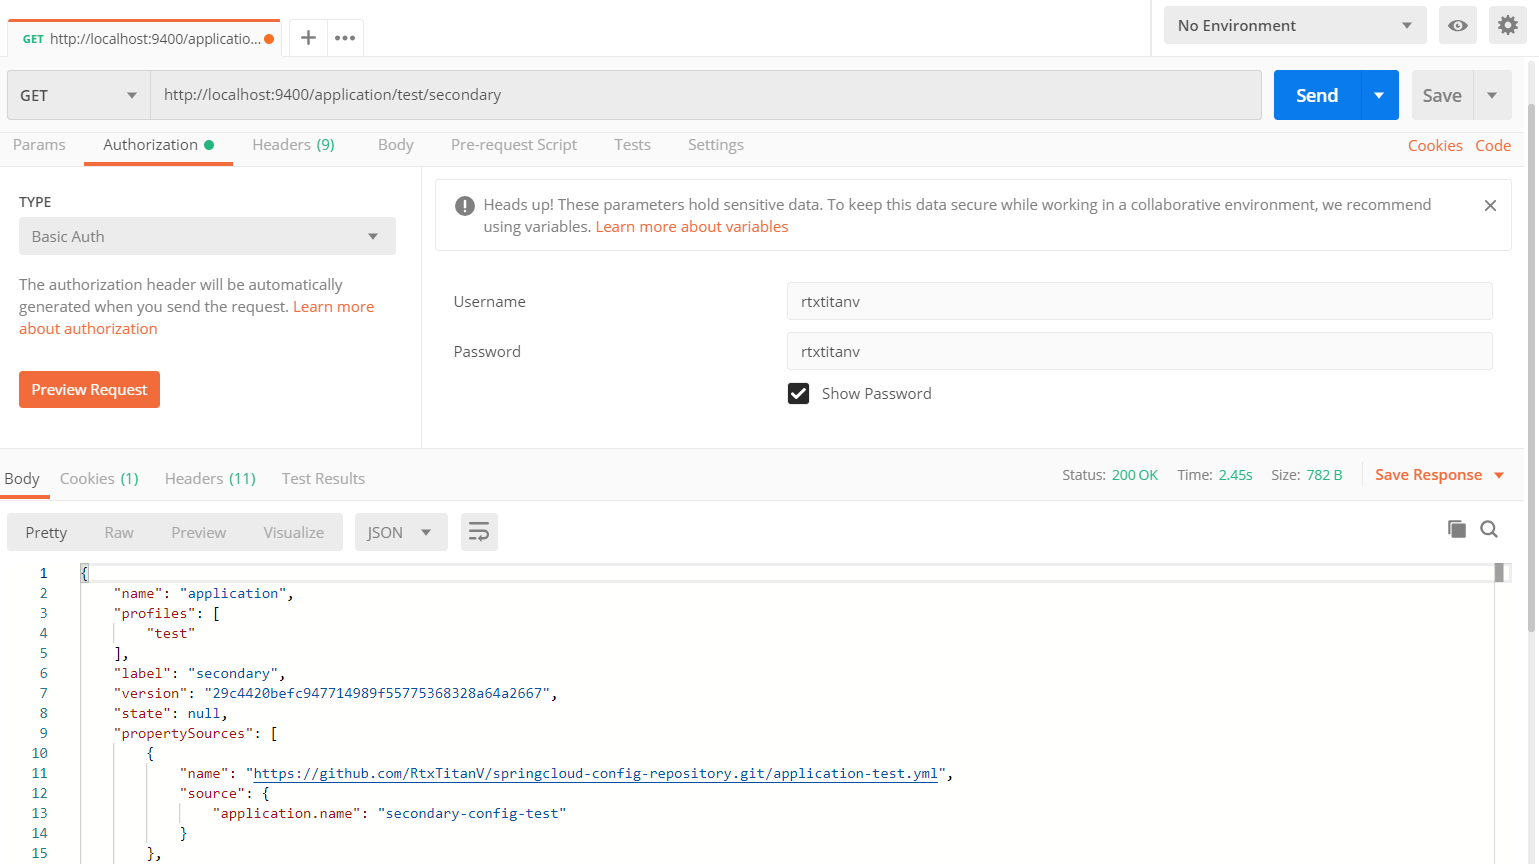
访问http://localhost:9400/application/test/secondary获取secondary分支test环境配置信息,下图为配置信息:
访问http://localhost:9400/master/application-dev.yml获取master分支application-dev.yml配置文件信息,下图为配置文件信息:

访问http://localhost:9400/master/application-pro.yml获取master分支application-pro.yml配置文件信息,下图为配置文件信息:

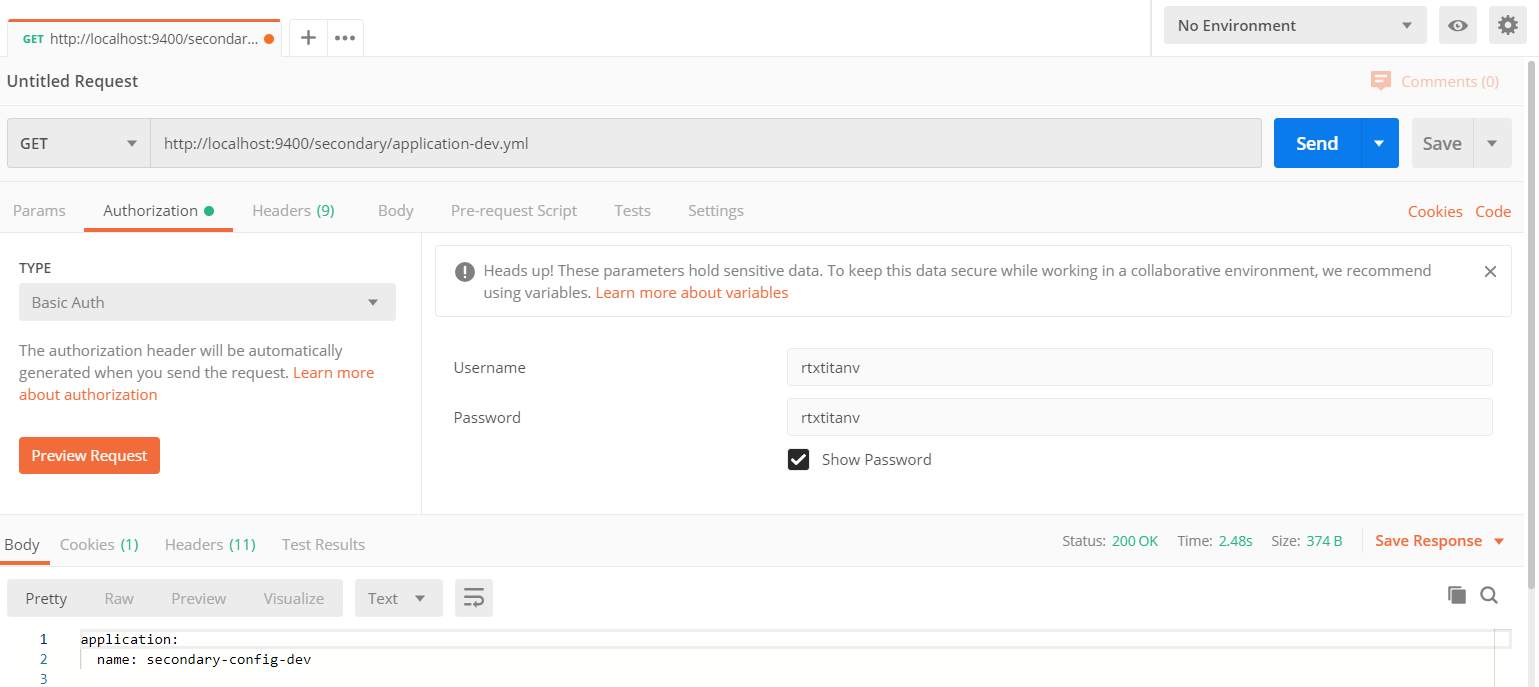
访问http://localhost:9400/secondary/application-dev.yml获取secondary分支application-dev.yml配置文件信息,下图为配置文件信息:
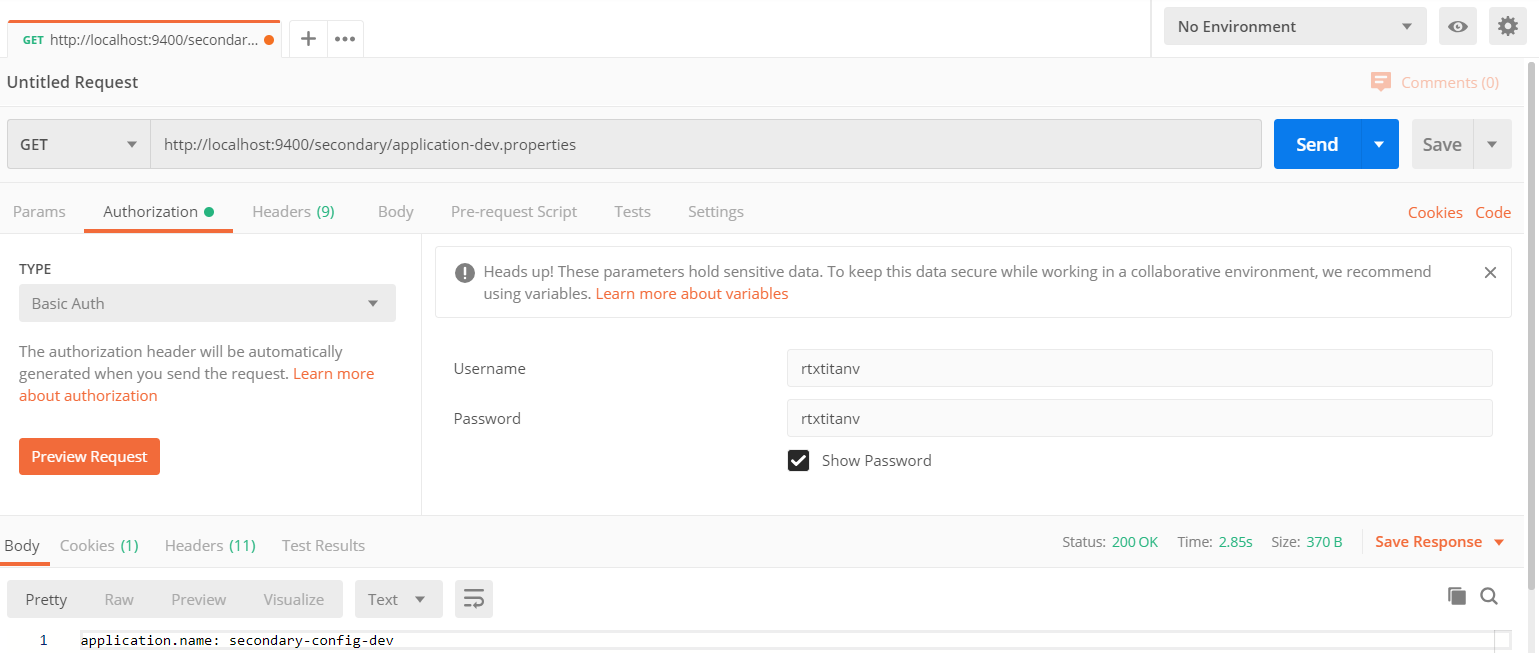
访问http://localhost:9400/secondary/application-dev.properties获取secondary分支application-dev.yml配置文件信息,不过返回的是properties格式,下图为配置文件信息:
如果想直接获取没有环境名的默认配置,使用default匹配没有环境名的配置文件,访问http://localhost:9400/master/application-default.yml获取master分支application.yml配置文件信息,下图为配置文件信息:

在访问http://localhost:9400/master/application-dev.yml获取master分支application-dev.yml配置文件信息时控制台打印了以下日志:
2020-03-09 19:07:38.710  INFO 3608 --- [nio-9400-exec-2] o.s.c.c.s.e.NativeEnvironmentRepository  : Adding property source: file:/C:/Users/nvidi/AppData/Local/Temp/config-repo-2390265840718149064/application-dev.yml
2020-03-09 19:07:38.710  INFO 3608 --- [nio-9400-exec-2] o.s.c.c.s.e.NativeEnvironmentRepository  : Adding property source: file:/C:/Users/nvidi/AppData/Local/Temp/config-repo-2390265840718149064/application.yml
Config配置中心服务器在从Git远程仓库中获取配置信息后,会在config服务端的文件系统中存储一份,实质上config服务端是通过git clone命令将配置内容复制了一份在本地存储,然后读取这些内容并返回给微服务应用进行加载。可以有效防止Git仓库出现故障时无法加载配置信息的情况。这里断开网络连接再次访问http://localhost:9400/master/application-dev.yml时控制台打印了以下日志并且依然能获取配置文件信息,结果这里就不贴了,这些配置文件信息来自于之前访问时存于config服务端本地文件系统中的配置信息。
2020-03-09 19:08:19.537  WARN 3608 --- [nio-9400-exec-8] .c.s.e.MultipleJGitEnvironmentRepository : Could not fetch remote for master remote: https://github.com/RtxTitanV/springcloud-config-repository.git
2020-03-09 19:08:19.804  INFO 3608 --- [nio-9400-exec-8] o.s.c.c.s.e.NativeEnvironmentRepository  : Adding property source: file:/C:/Users/nvidi/AppData/Local/Temp/config-repo-2390265840718149064/application-dev.yml
2020-03-09 19:08:19.804  INFO 3608 --- [nio-9400-exec-8] o.s.c.c.s.e.NativeEnvironmentRepository  : Adding property source: file:/C:/Users/nvidi/AppData/Local/Temp/config-repo-2390265840718149064/application.yml
三、创建Config客户端
通过Maven新建一个名为spring-cloud-config-client的项目。
1.引入依赖
SpringBoot和SpringCloud依赖这里就不列出来了,还需引入以下依赖:
<dependency>
<groupId>org.springframework.cloud</groupId>
<artifactId>spring-cloud-starter-config</artifactId>
</dependency>
<dependency>
<groupId>org.springframework.cloud</groupId>
<artifactId>spring-cloud-starter-netflix-eureka-client</artifactId>
</dependency>
<dependency>
<groupId>org.springframework.boot</groupId>
<artifactId>spring-boot-starter-web</artifactId>
</dependency>
2.主启动类
package com.rtxtitanv;
import org.springframework.boot.SpringApplication;
import org.springframework.boot.autoconfigure.SpringBootApplication;
import org.springframework.cloud.netflix.eureka.EnableEurekaClient;
@EnableEurekaClient
@SpringBootApplication
public class ConfigClientApplication {
public static void main(String[] args) {
SpringApplication.run(ConfigClientApplication.class, args);
}
}
3.编写配置文件
在bootstrap.yml里进行如下配置:
server:
port: ${PORT:9500}
spring:
application:
name: config-client
cloud:
config:
uri: http://localhost:9400/
username: rtxtitanv
password: rtxtitanv
name: application
profile: dev
label: master
eureka:
client:
register-with-eureka: true