���ҷ�����ı��������հ������������������ı��⡣
Ϊ��Ŀѡ�������Ժ���ѡ�������Ӳ�һ����Ӧ�ô�ʵ����������������ض��Ĺ���ѡ����ʵĹ��ߡ�
����ƪ�������һ������Ӻ�ʱ��ʼ����Ϊʲô����Ϊ Go ���������ҫ��������˵�����ı�����ڻ�������������˵�Ե÷dz��ȹ̡�������һ�㣬���ǽ�Ҫ��дһ�������������
Go Ϊ���ṩ�˺ܶ࣬������֧��������������Щ�ͼ�������ܵ�����û�и��õ������ˡ�
���������ʲô�� �и��ܰ���˵��������ת�� ���һ�ȡ���ͻ�������������������һ�����������ӷ�������ȡ����Ӧ�ٻظ�ԭ�ȵĿͻ��ˡ�������������˵��������������������˺�ʱ�����������δ���
Ϊʲô������ã���Ϊ��������ĸ�������˼������������Ա�Ӧ�������ͬ�ij��������ؾ��⣬A/B ���ԣ����ٻ��棬��֤�ȵȡ�
��������ƪ����֮�����ѧ����
- �����Ӧ HTTP ����
- ����������
- ���ͨ���������������ת������һ̨������
���ǵķ��������Ŀ
������ʵ��дһ����Ŀ��������Ҫһ�� Web �������ܹ��ṩ���¹��ܣ�
- ��ȡ������
- ��ȡ�����壬�ر��� proxy_condition �ֶ�
- ���������Ϊ A����ת���� URL 1
- ���������Ϊ B����ת���� URL 2
- ��������������ϣ���ת����Ĭ�ϵ� URL
������
- Go ���Ի�����
- http-server ���������ķ���
��������
����Ҫ���ĵ�һ�����ǽ����ǵ�������Ϣд�뻷����������˾Ϳ���ʹ�����Ƕ�����д�������ǵ�Դ�����С�
�ҷ�����õķ�ʽ�Ǵ���һ���������軷�������� .env �ļ���
���¾�����Ϊ�ض���Ŀ��д���ļ����ݣ�
export PORT=1330
export A_CONDITION_URL="http://localhost:1331"
export B_CONDITION_URL="http://localhost:1332"
export DEFAULT_CONDITION_URL=http://localhost:1333
�����Ҵ� 12 Factor App ��Ŀ�л�õļ��ɡ�
������ .env �ļ�֮��Ϳ������У�
���κ�ʱ�������и�ָ���������ü��ؽ�����������
��Ŀ��������
�������Ǵ��� main.go �ļ����������飺
- ��
PORT �� A_CONDITION_URL �� B_CONDITION_URL �� DEFAULT_CONDITION_URL ����ͨ����־��ӡ������̨��
- ��
/ ·���ϼ�������
package main

import (
 "bytes"
 "encoding/json"
 "io/ioutil"
 "log"
 "net/http"
 "net/http/httputil"
 "net/url"
 "os"
 "strings"
)

// Get env var or default
func getEnv(key, fallback string) string {
 if value, ok := os.LookupEnv(key); ok {
  return value
 }
 return fallback
}

// Get the port to listen on
func getListenAddress() string {
 port := getEnv("PORT", "1338")
 return ":" + port
}

// Log the env variables required for a reverse proxy
func logSetup() {
 a_condtion_url := os.Getenv("A_CONDITION_URL")
 b_condtion_url := os.Getenv("B_CONDITION_URL")
 default_condtion_url := os.Getenv("DEFAULT_CONDITION_URL")

 log.Printf("Server will run on: %s\n", getListenAddress())
 log.Printf("Redirecting to A url: %s\n", a_condtion_url)
 log.Printf("Redirecting to B url: %s\n", b_condtion_url)
 log.Printf("Redirecting to Default url: %s\n", default_condtion_url)
}

// Given a request send it to the appropriate url
func handleRequestAndRedirect(res http.ResponseWriter, req *http.Request) {
 // We will get to this...
}

func main() {
 // Log setup values
 logSetup()

 // start server
 http.HandleFunc("/", handleRequestAndRedirect)
 if err := http.ListenAndServe(getListenAddress(), nil); err != nil {
  panic(err)
 }
}
������Ϳ������д����ˡ�
����������
������Ŀ�Ļ����Ǽ�֮��������Ҫ��������������������������岿�֡����� handleRequestAndRedirect ���������������н����� proxy_condition �ֶΡ�
type requestPayloadStruct struct {
 ProxyCondition string `json:"proxy_condition"`
}

// Get a json decoder for a given requests body
func requestBodyDecoder(request *http.Request) *json.Decoder {
 // Read body to buffer
 body, err := ioutil.ReadAll(request.Body)
 if err != nil {
  log.Printf("Error reading body: %v", err)
  panic(err)
 }

 // Because go lang is a pain in the ass if you read the body then any susequent calls
 // are unable to read the body again....
 request.Body = ioutil.NopCloser(bytes.NewBuffer(body))

 return json.NewDecoder(ioutil.NopCloser(bytes.NewBuffer(body)))
}

// Parse the requests body
func parseRequestBody(request *http.Request) requestPayloadStruct {
 decoder := requestBodyDecoder(request)

 var requestPayload requestPayloadStruct
 err := decoder.Decode(&requestPayload)

 if err != nil {
  panic(err)
 }

 return requestPayload
}

// Given a request send it to the appropriate url
func handleRequestAndRedirect(res http.ResponseWriter, req *http.Request) {
 requestPayload := parseRequestBody(req)
  // ... more to come
}
ͨ�� proxy_condition �жϽ����������δ�
�������Ǵ�������ȡ���� proxy_condition ��ֵ�����Ը��������ж�����Ҫ����������δ�����ס���������ᵽ���������Σ�
- ���
proxy_condition ֵΪ A �����ǽ��������͵� A_CONDITION_URL
- ���
proxy_condition ֵΪ B �����ǽ��������͵� B_CONDITION_URL
- ����������������͵�
DEFAULT_CONDITION_URL
// Log the typeform payload and redirect url
func logRequestPayload(requestionPayload requestPayloadStruct, proxyUrl string) {
 log.Printf("proxy_condition: %s, proxy_url: %s\n", requestionPayload.ProxyCondition, proxyUrl)
}

// Get the url for a given proxy condition
func getProxyUrl(proxyConditionRaw string) string {
 proxyCondition := strings.ToUpper(proxyConditionRaw)

 a_condtion_url := os.Getenv("A_CONDITION_URL")
 b_condtion_url := os.Getenv("B_CONDITION_URL")
 default_condtion_url := os.Getenv("DEFAULT_CONDITION_URL")

 if proxyCondition == "A" {
  return a_condtion_url
 }

 if proxyCondition == "B" {
  return b_condtion_url
 }

 return default_condtion_url
}

// Given a request send it to the appropriate url
func handleRequestAndRedirect(res http.ResponseWriter, req *http.Request) {
 requestPayload := parseRequestBody(req)
 url := getProxyUrl(requestPayload.ProxyCondition)
 logRequestPayload(requestPayload, url)
 // more still to come...
}
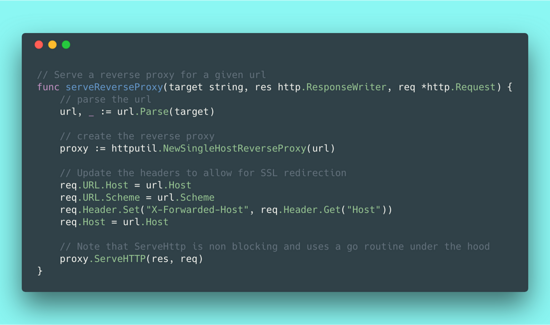
��������� URL
��������������ʵ�ʵķ���������֡�����˶��������Ҫ��дһ�����������Ҫ���Ǻܶණ����д��εĴ��롣������������һ�����ӵ��ⲿ�⡣
Ȼ�� Go �ı���ʹ�ô���һ����������dz����������㶼�������š��������������Ҫ����ؼ���һ�д��룺
httputil.NewSingleHostReverseProxy(url).ServeHTTP(res, req)
ע�������������������Щ������������������֧�� SSL �ض�����Ȼ���DZ���ģ���
// Serve a reverse proxy for a given url
func serveReverseProxy(target string, res http.ResponseWriter, req *http.Request) {
 // parse the url
 url, _ := url.Parse(target)

 // create the reverse proxy
 proxy := httputil.NewSingleHostReverseProxy(url)

 // Update the headers to allow for SSL redirection
 req.URL.Host = url.Host
 req.URL.Scheme = url.Scheme
 req.Header.Set("X-Forwarded-Host", req.Header.Get("Host"))
 req.Host = url.Host

 // Note that ServeHttp is non blocking and uses a go routine under the hood
 proxy.ServeHTTP(res, req)
}

// Given a request send it to the appropriate url
func handleRequestAndRedirect(res http.ResponseWriter, req *http.Request) {
 requestPayload := parseRequestBody(req)
 url := getProxyUrl(requestPayload.ProxyCondition)

 logRequestPayload(requestPayload, url)

 serveReverseProxy(url, res, req)
}
ȫ������
���ˣ������������ǵķ����������������� 1330 �˿ڡ��������� 3 ���ķ���ֱ���� 1331�C1333 �˿ڣ��ڸ��Ե��ն��У���
- source .env && go install && $GOPATH/bin/reverse-proxy-demo
- http-server -p 1331
- http-server -p 1332
- http-server -p 1333
��Щ��������֮�����ǾͿ�������һ���ն���������������ʼ���ʹ��� JSON ��������ˣ�
curl --request GET \
 --url http://localhost:1330/ \
 --header 'content-type: application/json' \
 --data '{
 "proxy_condition": "a"
 }'
���������һ�����õ� HTTP ����ͻ��ˣ��Ҽ����Ƽ� Insomnia ��
Ȼ�����Ǿͻῴ�����ǵķ������������ת���������Ǹ��� proxy_condition �ֶ����õ� 3 ̨�����е�����һ̨��
�ܽ�
Go Ϊ���ṩ�˺ܶ࣬������֧��������������Щ�ͼ�������ܵ�����û�и��õ������ˡ�����д���������������ܣ��ɿ�������ʱ����������������
���ܿ������Ժ��һᾭ��ʹ�� Go ����д�ķ���
�����ǿ�Դ�ģ�������� Github ���ҵ��� :heart: �� Twitter ����ֻ�Ĺ��ڱ�̺�Զ�̹�����صĶ����������ע�ң��㲻���ڵġ�
jsjbwy