2.4.2 Date & Time组件(上)
本节引言:
本节给大家带来的是Android给我们提供的显示时间的几个控件,他们分别是: TextClock,AnalogClock,Chronometer,另外其实还有个过时的DigitalClock就不讲解了! 好的,开始本节内容!
1.TextClock(文本时钟)
TextClock是在Android 4.2(API 17)后推出的用来替代DigitalClock的一个控件!
TextClock可以以字符串格式显示当前的日期和时间,因此推荐在Android 4.2以后使用TextClock。
这个控件推荐在24进制的android系统中使用,TextClock提供了两种不同的格式, 一种是在24进制中显示时间和日期,另一种是在12进制中显示时间和日期。大部分人喜欢默认的设置。
可以通过调用:TextClock提供的is24HourModeEnabled()方法来查看,系统是否在使用24进制时间显示! 在24进制模式中:
- 如果没获取时间,首先通过getFormat24Hour()返回值;
- 获取失败则通过getFormat12Hour()获取返回值;
- 以上都获取失败则使用默认;
另外他给我们提供了下面这些方法,对应的还有get方法:
| Attribute Name | Related Method | Description |
|---|
| android:format12Hour | setFormat12Hour(CharSequence) | 设置12时制的格式 |
| android:format24Hour | setFormat24Hour(CharSequence) | 设置24时制的格式 |
| android:timeZone | setTimeZone(String) | 设置时区 |
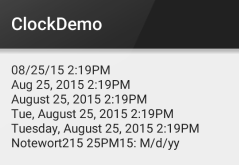
其实更多的时间我们是花在时间形式定义上,就是里面这个CharSequence! 这里提供下常用的写法以及结果:
<TextClock
        android:layout_width="wrap_content"
        android:layout_height="wrap_content"
        android:format12Hour="MM/dd/yy h:mmaa"/>
    <TextClock
        android:layout_width="wrap_content"
        android:layout_height="wrap_content"
        android:format12Hour="MMM dd, yyyy h:mmaa"/>
    <TextClock
        android:layout_width="wrap_content"
        android:layout_height="wrap_content"
        android:format12Hour="MMMM dd, yyyy h:mmaa"/>
    <TextClock
        android:layout_width="wrap_content"
        android:layout_height="wrap_content"
        android:format12Hour="E, MMMM dd, yyyy h:mmaa"/>
    <TextClock
        android:layout_width="wrap_content"
        android:layout_height="wrap_content"
        android:format12Hour="EEEE, MMMM dd, yyyy h:mmaa"/>
    <TextClock
        android:layout_width="wrap_content"
        android:layout_height="wrap_content"
        android:format12Hour="Noteworthy day: 'M/d/yy"/>
运行结果:
PS:另外minsdk 要大于或者等于17哦!
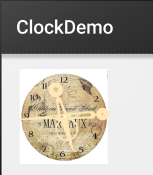
2.AnalogClock(模拟时钟)
就是下图这种:

官网中我们可以看到这样三个属性:
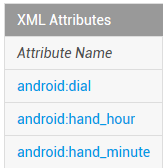
依次是:表背景,表时针,分时针的图片,我们可以自行定制:
示例代码如下:
<AnalogClock
        android:layout_width="100dp"
        android:layout_height="100dp"
        android:dial="@mipmap/ic_c_bg"
        android:hand_hour="@mipmap/zhen_shi"
        android:hand_minute="@mipmap/zhen_fen" />
运行结果:
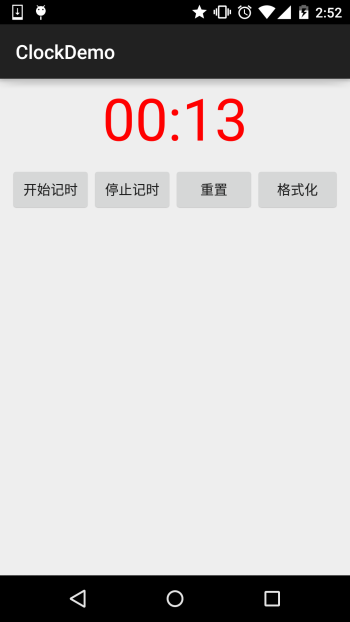
3.Chronometer(计时器)
如题,就是一个简单的计时器,我们直接上使用示例吧:
使用示例:
实现代码:
布局代码: <Chronometer
android:id="@+id/chronometer"
android:layout_width="fill_parent"
android:layout_height="wrap_content"
android:gravity="center"
android:textColor="#ff0000"
android:textSize="60dip" />
<LinearLayout
android:layout_width="fill_parent"
android:layout_height="wrap_content"
android:layout_margin="10dip"
android:orientation="horizontal">
<Button
android:id="@+id/btnStart"
android:layout_width="fill_parent"
android:layout_height="wrap_content"
android:layout_weight="1"
android:text="开始记时" />
<Button
android:id="@+id/btnStop"
android:layout_width="fill_parent"
android:layout_height="wrap_content"
android:layout_weight="1"
android:text="停止记时" />
<Button
android:id="@+id/btnReset"
android:layout_width="fill_parent"
android:layout_height="wrap_content"
android:layout_weight="1"
android:text="重置" />
<Button
android:id="@+id/btn_format"
android:layout_width="wrap_content"
android:layout_height="wrap_content"
android:text="格式化" />
</LinearLayout>
MainActivity.java
public class MainActivity extends AppCompatActivity implements View.OnClickListener,Chronometer.OnChronometerTickListener{
private Chronometer chronometer;
private Button btn_start,btn_stop,btn_base,btn_format;

@Override
protected void onCreate(Bundle savedInstanceState) {
    super.onCreate(savedInstanceState);
    setContentView(R.layout.activity_main);
    initView();
}

private void initView() {
    chronometer = (Chronometer) findViewById(R.id.chronometer);
    btn_start = (Button) findViewById(R.id.btnStart);
    btn_stop = (Button) findViewById(R.id.btnStop);
    btn_base = (Button) findViewById(R.id.btnReset);
    btn_format = (Button) findViewById(R.id.btn_format);

    chronometer.setOnChronometerTickListener(this);
    btn_start.setOnClickListener(this);
    btn_stop.setOnClickListener(this);
    btn_base.setOnClickListener(this);
    btn_format.setOnClickListener(this);

}

@Override
public void onClick(View v) {
    switch (v.getId()){
        case R.id.btnStart:
            chronometer.start();// 开始计时
            break;
        case R.id.btnStop:
            chronometer.stop();// 停止计时
            break;
        case R.id.btnReset:
            chronometer.setBase(SystemClock.elapsedRealtime());// 复位
            break;
        case R.id.btn_format:
            chronometer.setFormat("Time:%s");// 更改时间显示格式
            break;
    }
}

@Override
public void onChronometerTick(Chronometer chronometer) {
    String time = chronometer.getText().toString();
    if(time.equals("00:00")){
        Toast.makeText(MainActivity.this,"时间到了~",Toast.LENGTH_SHORT).show();
    }
}
}
运行截图:
本节小结:
本节跟大家简单的介绍了TextClock,AnalogClock,Chronometer这三个组件,从篇幅就可以看出 其实这几个东西用得并不多,几乎是没用过...知道下就好,用法也超简单... 就这样吧,本节就到这里~谢谢
cs