安装Nuget包
项目中添加包:dotnet add package Microsoft.AspNetCore.Authentication.JwtBearer
添加认证配置
Startup类中添加如下配置:
public void ConfigureServices(IServiceCollection services)
{
    ...
    services.AddAuthentication(defaultScheme: JwtBearerDefaults.AuthenticationScheme);
}

public void Configure(IApplicationBuilder app, IWebHostEnvironment env)
{
    ...
    app.UseAuthentication();
    app.UseAuthorization();
    app.UseEndpoints(endpoints =>
    {
        endpoints.MapControllers();
    });
}
AddAuthentication方法会向依赖注入容器添加认证服务和它所使用的其他服务,其参数defaultScheme用于指定当未指定具体的认证方案时将会使用的默认方案,上例为Bearer认证。
AddAuthentication方法的另一重载能够使用AuthenticationOptions类为认证过程中的每一个动作指明所使用的认证方案,如DefaultAuthenticateScheme、
DefaultChallengeScheme、
DefaultSignInScheme、
DefaultSignOutScheme、
DefaultForbidScheme。
如果没有为这些属性设置认证方案,则将使用DefaultScheme属性所指定的值。
当添加JwtBearer认证方式时,JwtBearerOptions对象能够配置该认证的选项,它的TokenValidationParameters属性用于指定验证Token时的规则:
var tokenSection = Configuration.GetSection("Security:Token");
services.AddAuthentication(options => {
    options.DefaultAuthenticateScheme = JwtBearerDefaults.AuthenticationScheme;
    options.DefaultChallengeScheme = JwtBearerDefaults.AuthenticationScheme;
}).AddJwtBearer(options => {
    options.TokenValidationParameters = new TokenValidationParameters{
        ValidateAudience = true,
        ValidateLifetime = true,
        ValidateIssuer = true,
        ValidateIssuerSigningKey = true,
        ValidIssuer = tokenSection["Issuer"],
        ValidAudience = tokenSection["Audience"],
        IssuerSigningKey = new SymmetricSecurityKey(
            Encoding.UTF8.GetBytes(tokenSection["Key"])
        ),
        ClockSkew = TimeSpan.Zero
    };
});
TokenValidationParameters类作为Token验证参数类,它包含了一些属性,这些属性如ValidateAudience、ValidateIssuer、ValidateLifetime和ValidateIssuerSigningKey,它们都是布尔类型,用于指明是否验证相应的项;而ValidIssuer和ValidAudience属性则用于指明合法的签发者(Issuer)与接受方(Audience)。在上例中,它们的值都从配置文件中获取;IssuerSigningKey属性的值用于指定进行签名验证的安全密钥,它的值为SymmetricSecurityKey对象,即对称加密密钥;ClockSkew属性的值表示验证时间的时间偏移值。
上述代码会从配置文件中读取关于Token的信息,因此还需在appsettings.json中添加如下内容。
"Security": {
  "Token": {
    "Issuer": "demo_issuer",
    "Audience": "demo_audience",
    "Key": "<your_secret_key>"
  }
}
为Controller添加认证
接下来,为了使用ASP.NET Core的认证功能来保护资源,应为Controller或Action添加[Authorize]特性,该特性能够实现在访问相应的Controller或Action时,要求请求方提供指定的认证方式,它位于Microsoft.AspNetCore.Authorization命名空间中。需要为AuthorController和BookController添加该特性。
[Authorize]
public class AuthorController : ControllerBase
{
}
[Authorize(AuthenticationSchemes = JwtBearerDefaults.AuthenticationScheme)]
public class BookController : ControllerBase
{
}
如果使用了多个认证方式,则可以使用[Authorize]特性的AuthenticationSchemes属性指明当前Controller或Action要使用哪一种认证方式(如上例中的BookController);如果不设置,则会使用所添加认证时设置的默认方案;如果没有设置默认方案,则会出现InvalidOperationException异常,并提示未指定默认方案;此外,如果为AuthenticationSchemes属性指定了不存在的方案名称,也会出现InvalidOperationException异常。
此时再访问Book和Author资源,会出现401 Unauthorized异常:

如果要允许某个Action可以被匿名访问,可以在Action方法上添加属性标记 [AllowAnonymous]:
[AllowAnonymous]
public async Task<ActionResult<IEnumerable<AuthorDto>>> GetAuthorsAsync([FromQuery] AuthorResourceParameters parameters)
添加认证信息生成接口
JwtBearer中间件提供了对JWT的验证功能,然而并未提供生成Token的功能。要生成Token,可以使用JwtSecurityTokenHandler类,它位于System.IdentityModel.Tokens.Jwt命名空间,它不仅能够生成JWT,由于它实现了ISecurityTokenValidator接口,因此对JWT的验证也是由它完成的。接下来,我们将创建一个Controller,它将会根据用户的认证信息生成JWT,并返回给客户端。
在Controllers文件夹中创建一个Controller,名为AuthenticateController,内容如下:
using System;
using System.Collections.Generic;
using System.IdentityModel.Tokens.Jwt;
using System.Security.Claims;
using System.Text;
using Microsoft.AspNetCore.Mvc;
using Microsoft.Extensions.Configuration;
using Microsoft.IdentityModel.Tokens;

namespace Library.Api.Controllers
{
    [ApiController, Route("api/auth")]
    public class AuthenticateController : ControllerBase
    {
        public IConfiguration Configuration { get; }
        public AuthenticateController(IConfiguration configuration)
        {
            Configuration = configuration;
        }

        [HttpPost("token", Name = nameof(GenerateToken))]
        public IActionResult GenerateToken(string username, string password)
        {
            if (username != "demouser" || password != "demopassword")
            {
                return Unauthorized();
            }

            var claims = new List<Claim>{
                new Claim(JwtRegisteredClaimNames.Sub, username)
            };

            var tokenConfigSection = Configuration.GetSection("Security:Token");
            var key = new SymmetricSecurityKey(
                Encoding.UTF8.GetBytes(tokenConfigSection["Key"])
            );
            var signCredential = new SigningCredentials(key, SecurityAlgorithms.HmacSha256);
            var jwtToken = new JwtSecurityToken(
                issuer: tokenConfigSection["Issuer"],
                audience: tokenConfigSection["Audience"],
                claims: claims,
                expires: DateTime.Now.AddMinutes(3),
                signingCredentials: signCredential
            );

            return Ok(new {
                token = new JwtSecurityTokenHandler().WriteToken(jwtToken),
                expiration = TimeZoneInfo.ConvertTimeFromUtc(jwtToken.ValidTo, TimeZoneInfo.Local)
            });
        }
    }
}
在AuthenticateController中的GenerateToken方法中,通过创建JwtSecurityToken对象,并使用JwtSecurityTokenHandler对象的WriteToken方法最终得到生成的JWT。当创建JwtSecurityToken对象时,我们可以指定issuer、audience以及当前用户的Claim信息,此外,还可以指定该Token的有效时间。这里需要注意,由于JWT不支持销毁以及撤回功能,因此在设置它的有效时间时,应设置一个较短的时间(如上例中的3分钟),这样可以有效避免Token在意外被窃取后所带来的风险。
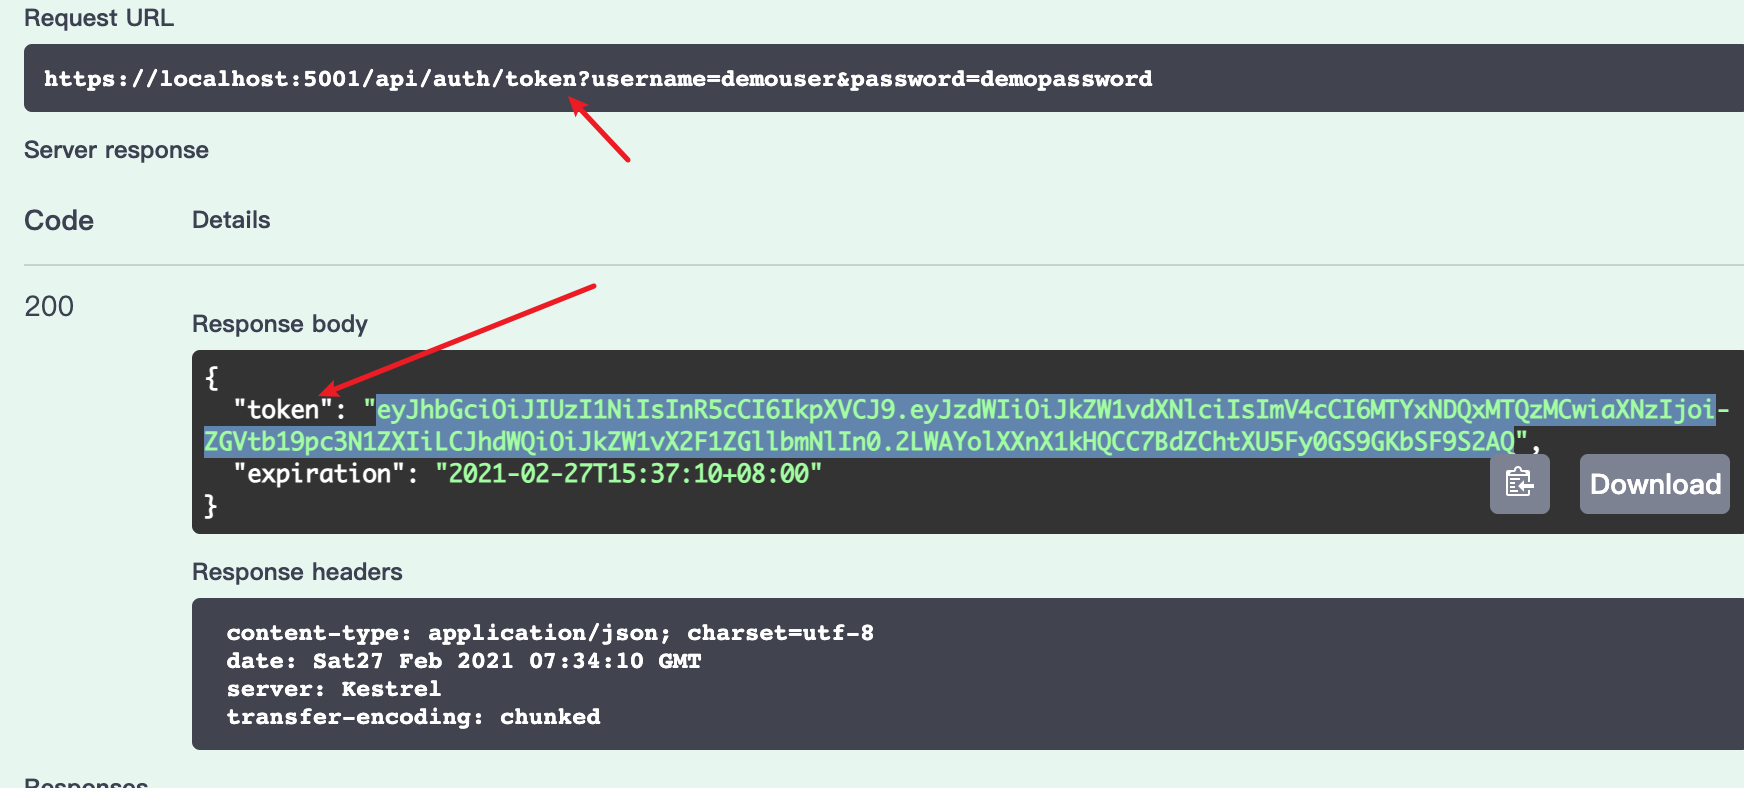
现在就可以请求认证接口获取 token:
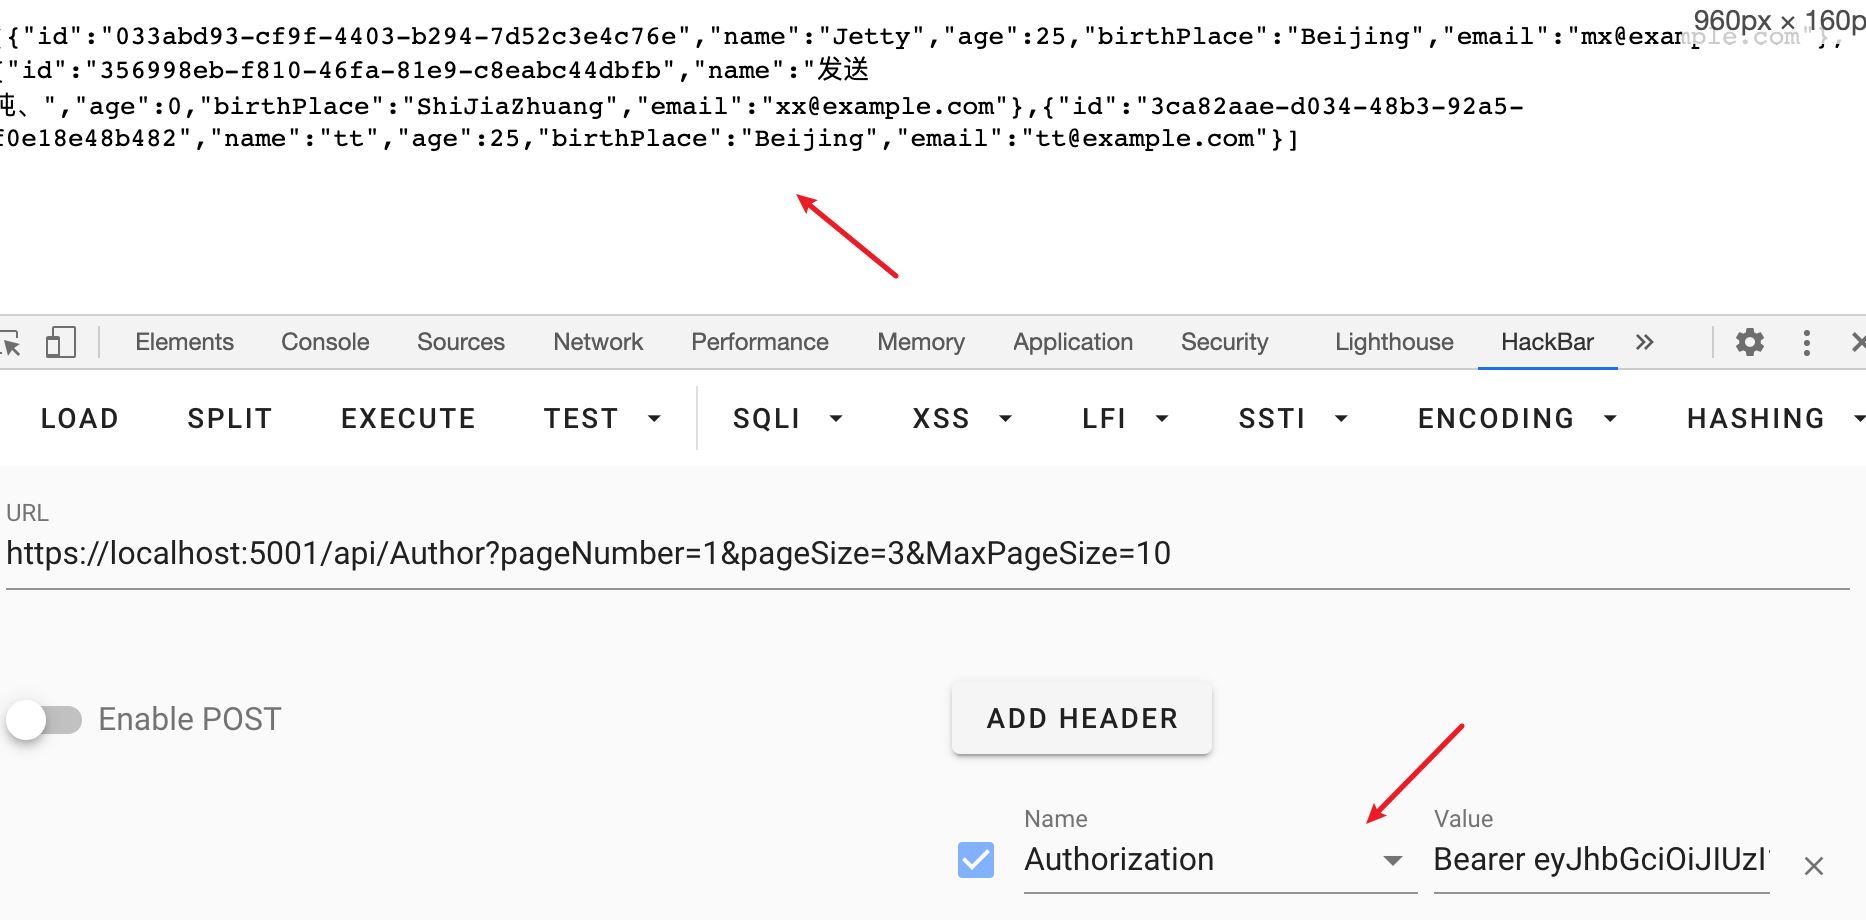
这时重新请求资源接口,在请求头中添加Authorization项,值为Bearer ,就可以得到结果了:
这次示例中,使用了固定的用户名和密码,实际情况中,用户名和密码通常是存在数据库中的,可以使用ASP.NET Core Identity来实现这一功能。
jsjbwy