import java.util.ArrayList;
import java.util.Collection;
import java.util.LinkedHashMap;
import java.util.Map;

import javax.servlet.Filter;

import org.apache.shiro.authc.credential.HashedCredentialsMatcher;
import org.apache.shiro.codec.Base64;
import org.apache.shiro.mgt.SecurityManager;
import org.apache.shiro.session.SessionListener;
import org.apache.shiro.session.mgt.SessionManager;
import org.apache.shiro.session.mgt.eis.EnterpriseCacheSessionDAO;
import org.apache.shiro.session.mgt.eis.JavaUuidSessionIdGenerator;
import org.apache.shiro.session.mgt.eis.SessionDAO;
import org.apache.shiro.session.mgt.eis.SessionIdGenerator;
import org.apache.shiro.spring.security.interceptor.AuthorizationAttributeSourceAdvisor;
import org.apache.shiro.spring.web.ShiroFilterFactoryBean;
import org.apache.shiro.web.filter.authc.FormAuthenticationFilter;
import org.apache.shiro.web.mgt.CookieRememberMeManager;
import org.apache.shiro.web.mgt.DefaultWebSecurityManager;
import org.apache.shiro.web.servlet.SimpleCookie;
import org.apache.shiro.web.session.mgt.DefaultWebSessionManager;
import org.crazycake.shiro.RedisCacheManager;
import org.crazycake.shiro.RedisManager;
import org.springframework.aop.framework.autoproxy.DefaultAdvisorAutoProxyCreator;
import org.springframework.beans.factory.config.MethodInvokingFactoryBean;
import org.springframework.boot.autoconfigure.condition.ConditionalOnMissingBean;
import org.springframework.context.annotation.Bean;
import org.springframework.context.annotation.Configuration;

import com.filter.ClearSessionCacheFilter;
import com.session.ShiroSessionListener;
import com.shiro.CustomRealm;

@Configuration
public class ShiroConfig {

	@Bean
	@ConditionalOnMissingBean
	public DefaultAdvisorAutoProxyCreator defaultAdvisorAutoProxyCreator() {
		DefaultAdvisorAutoProxyCreator defaultAAP = new DefaultAdvisorAutoProxyCreator();
		defaultAAP.setProxyTargetClass(true);
		return defaultAAP;
	}

	// 将自己的验证方式加入容器
	@Bean
	public CustomRealm myShiroRealm() {
		CustomRealm customRealm = new CustomRealm();
		/* 开启支持缓存,需要配置如下几个参数 */
		customRealm.setCachingEnabled(true);
        customRealm.setCredentialsMatcher(hashedCredentialsMatcher());
		// 启用身份验证缓存,即缓存AuthenticationInfo信息,默认false
		customRealm.setAuthenticationCachingEnabled(true);
		// 缓存AuthenticationInfo信息的缓存名称 在 ehcache-shiro.xml 中有对应缓存的配置
		customRealm.setAuthenticationCacheName("authenticationCache");
		// 启用授权缓存,即缓存AuthorizationInfo信息,默认false
		customRealm.setAuthorizationCachingEnabled(true);
		// 缓存AuthorizationInfo 信息的缓存名称  在 ehcache-shiro.xml 中有对应缓存的配置
		customRealm.setAuthorizationCacheName("authorizationCache");
		return customRealm;
	}

	// 权限管理,配置主要是Realm的管理认证
	@Bean
	public SecurityManager securityManager() {
		DefaultWebSecurityManager securityManager = new DefaultWebSecurityManager();
		securityManager.setRealm(myShiroRealm());
		// 将 CookieRememberMeManager 注入到 SecurityManager 中,否则不会生效
		securityManager.setRememberMeManager(rememberMeManager());
		// 将 sessionManager 注入到 SecurityManager 中,否则不会生效
		securityManager.setSessionManager(sessionManager());
		// 将 RedisCacheManager 注入到 SecurityManager 中,否则不会生效
		securityManager.setCacheManager(redisCacheManager());
		return securityManager;
	}
	// Filter工厂,设置对应的过滤条件和跳转条件
	@Bean
	public ShiroFilterFactoryBean shiroFilterFactoryBean(SecurityManager securityManager) {
		ShiroFilterFactoryBean shiroFilter = new ShiroFilterFactoryBean();
		// Shiro的核心安全接口,这个属性是必须的
		shiroFilter.setSecurityManager(securityManager);

		// 不输入地址的话会自动寻找项目web项目的根目录下的/page/login.jsp页面。
		shiroFilter.setLoginUrl("/login");
		// 登录成功默认跳转页面,不配置则跳转至”/”。如果登陆前点击的一个需要登录的页面,则在登录自动跳转到那个需要登录的页面。不跳转到此。
		shiroFilter.setSuccessUrl("/shiro_index");

		// 自定义拦截器
		LinkedHashMap<String, Filter> filtersMap = new LinkedHashMap<>();
		// 清除过期缓存的拦截器
		filtersMap.put("clearSession", clearSessionCacheFilter());
		shiroFilter.setFilters(filtersMap);

		// 没有权限默认跳转的页面
		//shiroFilter.setUnauthorizedUrl("");

		// filterChainDefinitions的配置顺序为自上而下,以最上面的为准
		// shiroFilter.setFilterChainDefinitions("");
		// Shiro验证URL时,URL匹配成功便不再继续匹配查找(所以要注意配置文件中的URL顺序,尤其在使用通配符时),配置不会被拦截的链接 顺序判断
		Map<String, String> map = new LinkedHashMap<>();

		// 不能对login方法进行拦截,若进行拦截的话,这辈子都登录不上去了,这个login是LoginController里面登录校验的方法
		map.put("/login", "anon"); //
		map.put("/unlockAccount", "anon");
		map.put("/verificationCode","anon");
		map.put("/static/**", "anon");
		//map.put("/", "anon");
		//对所有用户认证
		map.put("/**", "clearSession,authc");//user,

		shiroFilter.setFilterChainDefinitionMap(map);
		return shiroFilter;
	}

	@Bean
	public AuthorizationAttributeSourceAdvisor authorizationAttributeSourceAdvisor(SecurityManager securityManager) {
		AuthorizationAttributeSourceAdvisor authorizationAttributeSourceAdvisor = new AuthorizationAttributeSourceAdvisor();
		authorizationAttributeSourceAdvisor.setSecurityManager(securityManager);
		return authorizationAttributeSourceAdvisor;
	}

	@Bean
	public SimpleCookie rememberMeCookie(){
		// 这个参数是cookie的名称,对应前端的checkbox的name = rememberMe
		SimpleCookie simpleCookie = new SimpleCookie("myCookie");
		//setcookie的httponly属性如果设为true的话,会增加对xss防护的安全系数。它有以下特点:

		// setcookie()的第七个参数
		// 设为true后,只能通过http访问,javascript无法访问
		// 防止xss读取cookie
		simpleCookie.setHttpOnly(true);
		simpleCookie.setPath("/");
		// 记住我cookie生效时间30天 ,单位秒;
		simpleCookie.setMaxAge(2592000);
		return simpleCookie;
	}
	/**
	 * cookie管理对象;记住我功能,rememberMe管理器
	 * @return
	 */
	@Bean
	public CookieRememberMeManager rememberMeManager(){
		CookieRememberMeManager cookieRememberMeManager = new CookieRememberMeManager();
		cookieRememberMeManager.setCookie(rememberMeCookie());
		// rememberMe cookie加密的密钥 建议每个项目都不一样 默认AES算法 密钥长度(128 256 512 位)
		cookieRememberMeManager.setCipherKey(Base64.decode("4AvVhmFLUs0KTA3Kprsdag=="));
		return cookieRememberMeManager;
	}

	/**
	 * FormAuthenticationFilter 过滤器 过滤记住我
	 * @return
	 */
	@Bean
	public FormAuthenticationFilter formAuthenticationFilter(){
		FormAuthenticationFilter formAuthenticationFilter = new FormAuthenticationFilter();
		// 对应前端的checkbox的name = rememberMe
		formAuthenticationFilter.setRememberMeParam("myCookie");
		return formAuthenticationFilter;
	}

	/**
	 * shiro缓存管理器;
	 * 需要添加到securityManager中
	 * @return
	 */
	@Bean
	public RedisCacheManager redisCacheManager(){
		RedisCacheManager redisCacheManager = new RedisCacheManager();
		redisCacheManager.setRedisManager(redisManager());
		// redis中针对不同用户缓存
		redisCacheManager.setPrincipalIdFieldName("userName");
		// 用户权限信息缓存时间
		redisCacheManager.setExpire(200000);
		return redisCacheManager;
	}

	/**
	 * 让某个实例的某个方法的返回值注入为Bean的实例
	 * Spring静态注入
	 * @return
	 */
	@Bean
	public MethodInvokingFactoryBean getMethodInvokingFactoryBean(){
		MethodInvokingFactoryBean factoryBean = new MethodInvokingFactoryBean();
		factoryBean.setStaticMethod("org.apache.shiro.SecurityUtils.setSecurityManager");
		factoryBean.setArguments(new Object[]{securityManager()});
		return factoryBean;
	}
    @Bean
	public HashedCredentialsMatcher hashedCredentialsMatcher() {
		HashedCredentialsMatcher retryLimitHashedCredentialsMatcher = new HashedCredentialsMatcher();
		// 散列算法:这里使用MD5算法;
		retryLimitHashedCredentialsMatcher.setHashAlgorithmName("md5");
		// 散列的次数,比如散列两次,相当于 md5(md5(""));
		retryLimitHashedCredentialsMatcher.setHashIterations(2);
		// storedCredentialsHexEncoded默认是true,此时用的是密码加密用的是Hex编码;false时用Base64编码
		retryLimitHashedCredentialsMatcher.setStoredCredentialsHexEncoded(true);
		return retryLimitHashedCredentialsMatcher;
	}
	/**
	 * 配置session监听
	 * @return
	 */
	@Bean("sessionListener")
	public ShiroSessionListener sessionListener(){
		ShiroSessionListener sessionListener = new ShiroSessionListener();
		return sessionListener;
	}
	/**
	 * 配置会话ID生成器
	 * @return
	 */
	@Bean
	public SessionIdGenerator sessionIdGenerator() {
		return new JavaUuidSessionIdGenerator();
	}
	/**
	 * SessionDAO的作用是为Session提供CRUD并进行持久化的一个shiro组件
	 * MemorySessionDAO 直接在内存中进行会话维护
	 * EnterpriseCacheSessionDAO  提供了缓存功能的会话维护,默认情况下使用MapCache实现,内部使用ConcurrentHashMap保存缓存的会话。
	 * @return
	 */
	@Bean
	public SessionDAO sessionDAO() {
		EnterpriseCacheSessionDAO enterpriseCacheSessionDAO = new EnterpriseCacheSessionDAO();
		// 使用 redisCacheManager
		enterpriseCacheSessionDAO.setCacheManager(redisCacheManager());
		// 设置session缓存的名字 默认为 shiro-activeSessionCache
		enterpriseCacheSessionDAO.setActiveSessionsCacheName("shiro_session_cache");
		// sessionId生成器
		enterpriseCacheSessionDAO.setSessionIdGenerator(sessionIdGenerator());
		return enterpriseCacheSessionDAO;
	}
	/**
	 * 配置保存sessionId的cookie
	 * 注意:这里的cookie 不是上面的记住我 cookie 记住我需要一个cookie session管理 也需要自己的cookie
	 * @return
	 */
	@Bean("sessionIdCookie")
	public SimpleCookie sessionIdCookie(){
		// 这个参数是cookie的名称
		SimpleCookie simpleCookie = new SimpleCookie("sid");
		// setcookie的httponly属性如果设为true的话,会增加对xss防护的安全系数。它有以下特点:
		// setcookie()的第七个参数
		// 设为true后,只能通过http访问,javascript无法访问
		// 防止xss读取cookie
		simpleCookie.setHttpOnly(true);
		simpleCookie.setPath("/");
		// maxAge=-1表示浏览器关闭时失效此Cookie
		simpleCookie.setMaxAge(-1);
		return simpleCookie;
	}
	/**
	 * 配置会话管理器,设定会话超时及保存
	 * @return
	 */
	@Bean("sessionManager")
	public SessionManager sessionManager() {

		DefaultWebSessionManager sessionManager = new DefaultWebSessionManager();
		// 为了解决输入网址地址栏出现 jsessionid 的问题
		sessionManager.setSessionIdUrlRewritingEnabled(false);
		Collection<SessionListener> listeners = new ArrayList<SessionListener>();
		// 配置监听
		listeners.add(sessionListener());
		sessionManager.setSessionListeners(listeners);
		sessionManager.setSessionIdCookie(sessionIdCookie());
		sessionManager.setSessionDAO(sessionDAO());
		sessionManager.setCacheManager(redisCacheManager());

		// 全局会话超时时间(单位毫秒),默认30分钟  暂时设置为10秒钟 用来测试
		// sessionManager.setGlobalSessionTimeout(10000);
		sessionManager.setGlobalSessionTimeout(1800000);
		// 是否开启删除无效的session对象  默认为true
		sessionManager.setDeleteInvalidSessions(true);
		// 是否开启定时调度器进行检测过期session 默认为true
		sessionManager.setSessionValidationSchedulerEnabled(true);
		// 设置session失效的扫描时间, 清理用户直接关闭浏览器造成的孤立会话 默认为 1个小时
		// 设置该属性 就不需要设置 ExecutorServiceSessionValidationScheduler 底层也是默认自动调用ExecutorServiceSessionValidationScheduler
		// 暂时设置为 5秒 用来测试
		sessionManager.setSessionValidationInterval(3600000);
		//     sessionManager.setSessionValidationInterval(5000);
		return sessionManager;
	}
	/**
	 * 校验当前缓存是否失效的拦截器
	 *
	 * */
	@Bean
	public ClearSessionCacheFilter clearSessionCacheFilter() {
		ClearSessionCacheFilter clearSessionCacheFilter = new ClearSessionCacheFilter();
		return clearSessionCacheFilter;
	}
	@Bean
	public RedisManager redisManager(){
		RedisManager redisManager = new RedisManager();
		redisManager.setHost("127.0.0.1");
		redisManager.setPort(6379);
        // 我的 redis 并未设置密码
		// redisManager.setPassword("123456");
		return redisManager;
	}

}
修改?CustomRealm :
? ? ? ?CustomRealm 的代码内容如下所示:需要注意的是在?doGetAuthenticationInfo() 方法里面 new SimpleAuthenticationInfo() 的构造方法的第一个参数得存 user 对象,因为他需要作为 redis 的 key ,还有就是?doGetAuthorizationInfo() 方法,从?redis 中取数据的时候,会出异常,参考我的这篇文章解决。
import java.util.ArrayList;
import java.util.List;

import org.apache.shiro.authc.AuthenticationInfo;
import org.apache.shiro.authc.AuthenticationToken;
import org.apache.shiro.authc.LockedAccountException;
import org.apache.shiro.authc.SimpleAuthenticationInfo;
import org.apache.shiro.authc.UnknownAccountException;
import org.apache.shiro.authz.AuthorizationInfo;
import org.apache.shiro.authz.SimpleAuthorizationInfo;
import org.apache.shiro.realm.AuthorizingRealm;
import org.apache.shiro.subject.PrincipalCollection;
import org.apache.shiro.util.ByteSource;
import org.springframework.beans.factory.annotation.Autowired;
import org.springframework.util.StringUtils;

import com.alibaba.fastjson.JSON;
import com.entity.Permission;
import com.entity.Role;
import com.entity.User;
import com.service.UserService;
import com.util.MyByteSource;

public class CustomRealm extends AuthorizingRealm{

	@Autowired
	UserService  userService;
	/*
	 * 权限配置类
	 */
	@Override
	protected AuthorizationInfo doGetAuthorizationInfo(PrincipalCollection principalCollection) {

		// 如果把下面的注释打开就会抛出异常,具体原因,参考我上面的说明
		// User sysuser = (User)principalCollection.getPrimaryPrincipal();
        // 采用这种获取方式不会出现异常
		User sysuser;
		Object object = principalCollection.getPrimaryPrincipal();
		if (object instanceof User) {
			sysuser = (User) object;
		} else {
			sysuser = JSON.parseObject(JSON.toJSON(object).toString(), User.class);
		}
		// 查询用户名称
		User user = userService.selectByUserName(sysuser.getUserName());
		// 添加角色和权限
		SimpleAuthorizationInfo simpleAuthorizationInfo = new SimpleAuthorizationInfo();
		List<String> roleNameList = new ArrayList<>();
		List<String> permissionNameList = new ArrayList<>();

		for (Role role : user.getRoles()) {
			roleNameList.add(role.getRoleName());
			for (Permission permission : role.getPermissions()) {
				permissionNameList.add(role.getRoleName()+":"+permission.getPermissionName());
			}
		}
		// 添加角色
		simpleAuthorizationInfo.addRoles(roleNameList);
		// 添加权限
		simpleAuthorizationInfo.addStringPermissions(permissionNameList);
		return simpleAuthorizationInfo;
	}

	/*
	 * 认证配置类
	 */
	@Override
	protected AuthenticationInfo doGetAuthenticationInfo(AuthenticationToken authenticationToken){
		if(StringUtils.isEmpty(authenticationToken.getPrincipal())) {
			return null;
		}
		// 获取用户信息
		String userName = authenticationToken.getPrincipal().toString();

		User user = userService.selectByUserName(userName);
		// 用户是否存在
		if(user == null) {
			throw new UnknownAccountException();
		}
		// 是否激活
		/*if(user !=null && user.getStatus().equals("0")){
			throw new  DisabledAccountException();
		}*/
		// 是否锁定
		if(user!=null && user.getStatus().equals("1")){
			throw new  LockedAccountException();
		}
		// 若存在将此用户存放到登录认证info中,无需做密码比对shiro会为我们进行密码比对校验
		if(user !=null && user.getStatus().equals("0")){
			//ByteSource credentialsSalt = ByteSource.Util.bytes(user.getUserName()+ "salt");
			ByteSource credentialsSalt = new MyByteSource(user.getUserName()+ "salt");
			/** 这里验证authenticationToken和simpleAuthenticationInfo的信息,构造方法支持三个或者四个参数,
			 *	第一个参数传入userName或者是user对象都可以。
			 *	第二个参数传入数据库中该用户的密码(记得是加密后的密码)
			 *	第三个参数传入加密的盐值,若没有则可以不加
			 *	第四个参数传入当前Relam的名字
			 **/
			SimpleAuthenticationInfo simpleAuthenticationInfo = new SimpleAuthenticationInfo(user, user.getPassword().toString(),credentialsSalt, getName());
			return simpleAuthenticationInfo;
		}
		return null;
	}
	/**
	 * 重写方法,清除当前用户的的 授权缓存
	 * @param principals
	 */
	@Override
	public void clearCachedAuthorizationInfo(PrincipalCollection principal) {
		 super.clearCachedAuthorizationInfo(principal);
	}
	/**
	 * 重写方法,清除当前用户的 认证缓存
	 * @param principals
	 */
	@Override
	public void clearCachedAuthenticationInfo(PrincipalCollection principal) {
		super.clearCachedAuthenticationInfo(principal);
	}

	/**
	 *  重写方法,清除当前用户的 认证缓存和授权缓存
	 * */
	@Override
	public void clearCache(PrincipalCollection principals) {
		super.clearCache(principals);
	}

	/**
	 * 自定义方法:清除所有用户的 授权缓存
	 */
	public void clearAllCachedAuthorizationInfo() {
		getAuthorizationCache().clear();
	}

	/**
	 * 自定义方法:清除所有用户的 认证缓存
	 */
	public void clearAllCachedAuthenticationInfo() {
		getAuthenticationCache().clear();
	}

	/**
	 * 自定义方法:清除所有用户的  认证缓存  和 授权缓存
	 */
	public void clearAllCache() {
		clearAllCachedAuthenticationInfo();
		clearAllCachedAuthorizationInfo();
	}
}
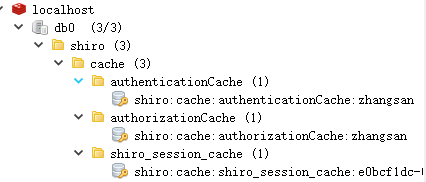
测试:
? ? ? ?正常启动项目,登录成功之后,可以在 redis manager?中查看创建的缓存,如下所示:
?
cs