public class HelloWorldDemo {
    @Test
    public void testDemo() throws Exception {
        ClassPathXmlApplicationContext context =
                new ClassPathXmlApplicationContext("/demo.xml", HelloWorldDemo.class);
        DirectChannel inputChannel = context.getBean("ic", DirectChannel.class);
        PollableChannel outputChannel = context.getBean("oc", PollableChannel.class);
        inputChannel.send(new GenericMessage<String>("World"));
        System.out.println("==> HelloWorldDemo: " + outputChannel.receive(0).getPayload());
        context.close();
    }

}

out:
==> HelloWorldDemo: Hello World
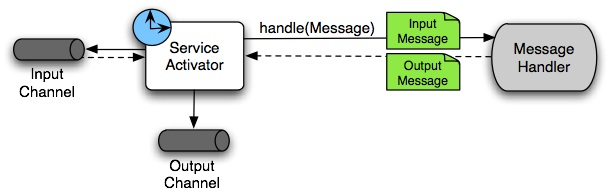
����ServiceActivator
����Ĵ�����ʾ�˵��÷�������վͨ���������ͱ��ij�վͨ���������� ����֮����һ����ע���ServiceActivator���������ServiceActivator����һ����Ϣ�˵㡣
��Ϣ�˵����Ҫ�������Է������Է�ʽ��Ӧ�ó���������ӵ���Ϣ���ݿ�ܡ����仰˵����������£�Ӧ�ó������Ӧ�ò�֪����Ϣ�������Ϣ�ܵ����������� MVC ��ʽ��controller �����á�����controller ���� HTTP ����һ������Ϣ�˵㴦����Ϣ���Լ�controller ӳ�䵽 URL ģʽһ������Ϣ�˵�ӳ�䵽��Ϣͨ���������������Ŀ������ͬ�ġ�
ServiceActivator�����ڽ�����ʵ�����ӵ���Ϣ����ϵͳ��ͨ�ö˵㡣��������������Ϣͨ�������Ҫ���õķ����ܹ�����ֵ���������ṩ�����Ϣͨ����
������������ͼ��
����Ĵ���Ƚϼ����ǻ����ᷢ������ֻ���������ͨ��oc������ͨ��ic��Ȼû�ж���Ҳ������Ӧ�ã��Dz��Ǻ���֣��������������ȿ���ServiceActivator��Դ�룺
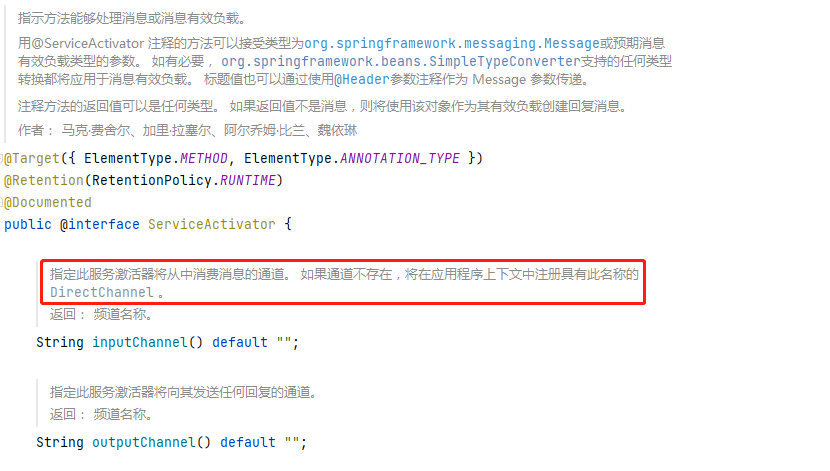
ע����д�ĺ�������������ͨ�������ڣ�����Ӧ�ó�����������ע����д����Ƶ�DirectChannel ���������Ķ��壬���Ǻ���ῴ�������ڲ�������һ������������ִ�й��̡�
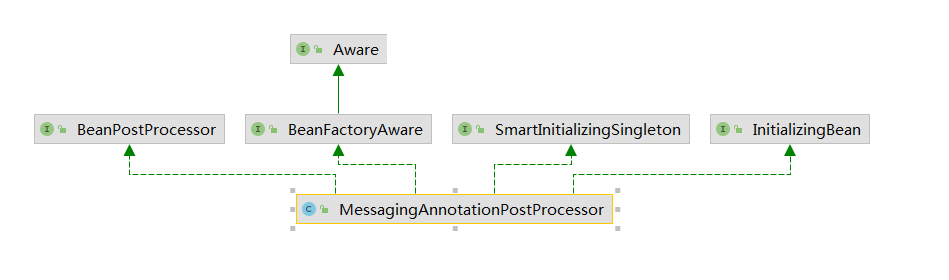
����ȫ�ֲ���ServiceActivator���������ı߽��д����ģ��������MessagingAnnotationPostProcessor�࣬����������������Ϣע���BeanPostProcessorʵ�֡�
	@Override
	public void afterPropertiesSet() {
		Assert.notNull(this.beanFactory, "BeanFactory must not be null");
		((BeanDefinitionRegistry) this.beanFactory).registerBeanDefinition(
				IntegrationContextUtils.DISPOSABLES_BEAN_NAME,
				BeanDefinitionBuilder.genericBeanDefinition(Disposables.class, Disposables::new)
						.getRawBeanDefinition());
		this.postProcessors.put(Filter.class, new FilterAnnotationPostProcessor(this.beanFactory));
		this.postProcessors.put(Router.class, new RouterAnnotationPostProcessor(this.beanFactory));
		this.postProcessors.put(Transformer.class, new TransformerAnnotationPostProcessor(this.beanFactory));
		this.postProcessors.put(ServiceActivator.class, new ServiceActivatorAnnotationPostProcessor(this.beanFactory));
		this.postProcessors.put(Splitter.class, new SplitterAnnotationPostProcessor(this.beanFactory));
		this.postProcessors.put(Aggregator.class, new AggregatorAnnotationPostProcessor(this.beanFactory));
		this.postProcessors.put(InboundChannelAdapter.class,
				new InboundChannelAdapterAnnotationPostProcessor(this.beanFactory));
		this.postProcessors.put(BridgeFrom.class, new BridgeFromAnnotationPostProcessor(this.beanFactory));
		this.postProcessors.put(BridgeTo.class, new BridgeToAnnotationPostProcessor(this.beanFactory));
		Map<Class<? extends Annotation>, MethodAnnotationPostProcessor<?>> customPostProcessors =
				setupCustomPostProcessors();
		if (!CollectionUtils.isEmpty(customPostProcessors)) {
			this.postProcessors.putAll(customPostProcessors);
		}
	}
��afterPropertiesSet�����У����ǿ���������һ��������postProcessors������ע������ص�ע����ࡣ����������Ϣ�˵㴦������������д��ServiceActivator�����й�������·�ɣ�ת�����ȸ��ֲ�ͬ�Ķ˵㷽����
���������¿�����Ȼʵ����BeanPostProcessor���DZ�ȻҪ�õ�postProcessAfterInitialization����ʵ�֣���������̴�ž��DZ�����������@ServiceActivator��bean��������������������������ֱ�ӿ��ص�Ĵ��롣
Object result = postProcessor.postProcess(bean, beanName, targetMethod, annotations);
����postProcess
��AbstractMethodAnnotationPostProcessor���и���ͨ����postProcess�������ɶ�Ӧ�Ķ˵���Ϣ��������룺
@Override
public Object postProcess(Object bean, String beanName, Method method, List<Annotation> annotations) {
Object sourceHandler = null;
if (beanAnnotationAware() && AnnotatedElementUtils.isAnnotated(method, Bean.class.getName())) {
if (!this.beanFactory.containsBeanDefinition(resolveTargetBeanName(method))) {
this.logger.debug("Skipping endpoint creation; perhaps due to some '@Conditional' annotation.");
return null;
}
else {
sourceHandler = resolveTargetBeanFromMethodWithBeanAnnotation(method);
}
}
//���ɶ�Ӧ��MessageHandler������ִ�ж�Ӧ��ע��ķ���
MessageHandler handler = createHandler(bean, method, annotations);
if (!(handler instanceof ReactiveMessageHandlerAdapter)) {
orderable(method, handler);
producerOrRouter(annotations, handler);
if (!handler.equals(sourceHandler)) {
handler = registerHandlerBean(beanName, method, handler);
}
handler = annotated(method, handler);
handler = adviceChain(beanName, annotations, handler);
}
//��MessageHandlerʵ�����ӵ���Ϣ�˵㣬���ɶ�Ӧ��endpoint��
AbstractEndpoint endpoint = createEndpoint(handler, method, annotations);
if (endpoint != null) {
return endpoint;
}
else {
return handler;
}
}
��������Ҫ�������£�
- ����ģ��ģʽ�в�ͬ��createHandler����ʵ�֣����ɶ�Ӧ��MessageHandler��Ʃ��˵������ߵ�
ServiceActivatorAnnotationPostProcessor
- ��MessageHandlerʵ�����ӵ���Ϣ�˵㣬���ɶ�Ӧ��endpoint��
1.createHandler
@Override
protected MessageHandler createHandler(Object bean, Method method, List<Annotation> annotations) {
AbstractReplyProducingMessageHandler serviceActivator;
if (AnnotatedElementUtils.isAnnotated(method, Bean.class.getName())) {
...
else {
serviceActivator = new ServiceActivatingHandler(bean, method);
}
String requiresReply = MessagingAnnotationUtils.resolveAttribute(annotations, "requiresReply", String.class);
if (StringUtils.hasText(requiresReply)) {
serviceActivator.setRequiresReply(resolveAttributeToBoolean(requiresReply));
}
String isAsync = MessagingAnnotationUtils.resolveAttribute(annotations, "async", String.class);
if (StringUtils.hasText(isAsync)) {
serviceActivator.setAsync(resolveAttributeToBoolean(isAsync));
}
//�Ƿ����������ͨ��
setOutputChannelIfPresent(annotations, serviceActivator);
return serviceActivator;
}
createHandler�Ĵ���Ƚϼ����Ǹ���ע���еļ������Ի��ж�Ӧ�ķ�������������ServiceActivatingHandler������ȥServiceActivatingHandler����������һ��ί�ж���MessagingMethodInvokerHelper�����Է���ķ�ʽ��ִ��Ŀ�귽����
2.createEndpoint
createEndpoint�����϶���֪����������Ϣ�˵㣬��ʵ��Ҳ�ǣ������ɵ�handler�Ͷ�Ӧ�Ĺܵ����й��������忴�´�����
protected AbstractEndpoint createEndpoint(MessageHandler handler, @SuppressWarnings("unused") Method method,
List<Annotation> annotations) {
AbstractEndpoint endpoint = null;
//ȡ��ע����inputChannelName
String inputChannelName = MessagingAnnotationUtils.resolveAttribute(annotations, getInputChannelAttribute(),
String.class);
if (StringUtils.hasText(inputChannelName)) {
MessageChannel inputChannel;
try {
//��beanFactory��ȡ�ö�Ӧ��ͨ��bean
inputChannel = this.channelResolver.resolveDestination(inputChannelName);
}
catch (DestinationResolutionException e) {
//ȡ���������Զ�ע��һ������ΪDirectChannel��inputChannel
if (e.getCause() instanceof NoSuchBeanDefinitionException) {
inputChannel = new DirectChannel();
this.beanFactory.registerSingleton(inputChannelName, inputChannel);
inputChannel = (MessageChannel) this.beanFactory.initializeBean(inputChannel, inputChannelName);
if (this.disposables != null) {
this.disposables.add((DisposableBean) inputChannel);
}
}
else {
throw e;
}
}
Assert.notNull(inputChannel, () -> "failed to resolve inputChannel '" + inputChannelName + "'");
//����endpoint
endpoint = doCreateEndpoint(handler, inputChannel, annotations);
}
return endpoint;
}
����Ĵ����У����Ǿ�������Ŀ���Ϊʲô������demo��û��ע������ͨ��Ҳ������Ӧ�õ�ԭ���ˣ��Ӷ��ش�֮ǰ�����ʡ�
protected AbstractEndpoint doCreateEndpoint(MessageHandler handler, MessageChannel inputChannel,
List<Annotation> annotations) {
....
else if (inputChannel instanceof SubscribableChannel) {
//����SubscribableChannel���Ͷ�Ӧ��ִ�ж˵�
return new EventDrivenConsumer((SubscribableChannel) inputChannel, handler);
}
else if (inputChannel instanceof PollableChannel) {
return pollingConsumer(inputChannel, handler, pollers);
}
else {
throw new IllegalArgumentException("Unsupported 'inputChannel' type: '"
+ inputChannel.getClass().getName() + "'. " +
"Must be one of 'SubscribableChannel', 'PollableChannel' or 'ReactiveStreamsSubscribableChannel'");
}
}
ͨ������һ�������֣�һ���Ƿ������ģ�һ���ǿ���ѯ�ģ�������Ĭ�����ߵĵ�һ�֣���ΪDirectChannelĬ�Ͼ��Ǹ�SubscribableChannel�������������������˶�Ӧ����Ϣ�˵���EventDrivenConsumer��
�����ȿ���EventDrivenConsumer����ṹ��
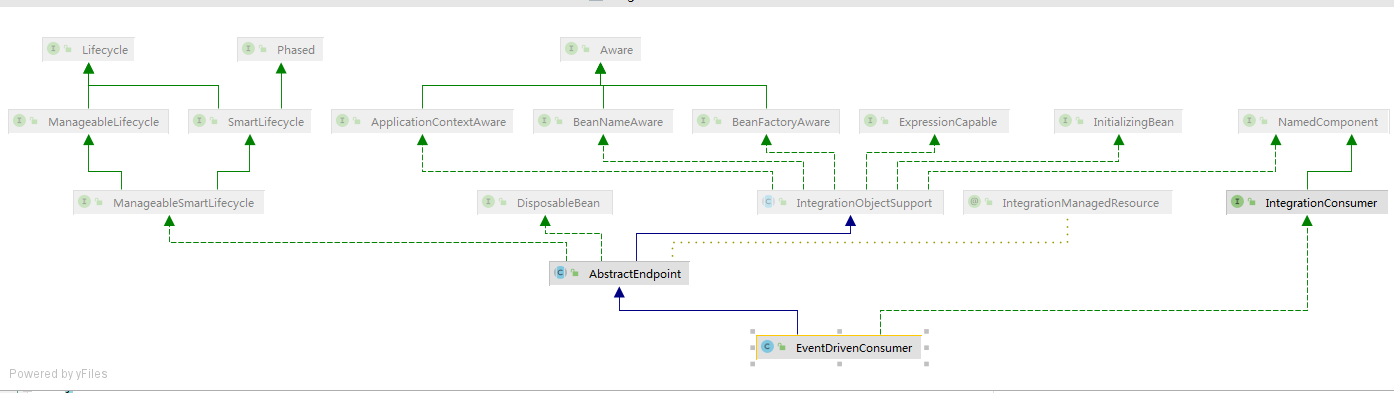
EventDrivenConsumer������һ��������AbstractEndpoint��������ʵ����Lifecycle�ӿڣ������������ڸ��������ߣ�����ֱ������star��������
@Override
protected void doStart() {
this.logComponentSubscriptionEvent(true);
//��handler��inputChannel���а�
this.inputChannel.subscribe(this.handler);
if (this.handler instanceof Lifecycle) {
((Lifecycle) this.handler).start();
}
}
	@Override
	public synchronized boolean addHandler(MessageHandler handler) {
		Assert.notNull(handler, "handler must not be null");
		Assert.isTrue(this.handlers.size() < this.maxSubscribers, "Maximum subscribers exceeded");
		boolean added = this.handlers.add(handler);
		if (this.handlers.size() == 1) {
			this.theOneHandler = handler;
		}
		else {
			this.theOneHandler = null;
		}
		return added;
	}
����Ĵ�����Ҫ���ǰ�handlerע�ᵽinputChannel�У�����ֻҪinputChannelͨ��һ�յ���Ϣ���ͻ�֪ͨ��ע���handlers���д����������бȽ�����ļ�¼��һ�еIJ������Ͳ�������ˡ�
�ģ�������Ϣ
ִ��������һϵ�е�ע�ᣬ�Ѿ�����һЩ��ͨ����ͨ�ˣ�ʣ�µľ��������ķ��Ͳ����ˡ����������inputChannel.send(new GenericMessage<String>("World"));����send������
/**
* �ڴ�Ƶ���Ϸ�����Ϣ�� ���ͨ����������˷�����������ֱ��������ʱ�����߳��жϡ� ���ָ���ij�ʱʱ��Ϊ 0����÷������������ء� ���С���㣬���������������������send(Message) ����
* ������
* messageArg �C Ҫ���͵���Ϣ
* timeout - �Ժ���Ϊ��λ�ij�ʱʱ��
* ���أ�
* true�����Ϣ���ͳɹ��� false�����Ϣ���ڹ涨ʱ���ڷ��ͻ����̱߳��ж�
*/
@Override
public boolean send(Message<?> messageArg, long timeout) {
...
try {
//message�Ƿ���Ҫת��
message = convertPayloadIfNecessary(message);
//����ǰ������
if (interceptorList.getSize() > 0) {
interceptorStack = new ArrayDeque<>();
message = interceptorList.preSend(message, this, interceptorStack);
if (message == null) {
return false;
}
}
if (this.metricsCaptor != null) {
sample = this.metricsCaptor.start();
}
//���Ͳ���
sent = doSend(message, timeout);
if (sample != null) {
sample.stop(sendTimer(sent));
}
metricsProcessed = true;
if (debugEnabled) {
logger.debug("postSend (sent=" + sent + ") on channel '" + this + "', message: " + message);
}
//���ͺ�������
if (interceptorStack != null) {
interceptorList.postSend(message, this, sent);
interceptorList.afterSendCompletion(message, this, sent, null, interceptorStack);
}
return sent;
}
catch (Exception ex) {
...
}
}
������send��������ȥ���ᷢ�ֲ�μ������ƪ��������ֱ�Ӹ����ص���룺
@Override
protected final void handleMessageInternal(Message<?> message) {
Object result;
if (this.advisedRequestHandler == null) {
//����ִ�ж�Ӧ�Ķ˵㷽��
result = handleRequestMessage(message);
}
else {
result = doInvokeAdvisedRequestHandler(message);
}
if (result != null) {
//��outputChannel����ִ�н��
sendOutputs(result, message);
}
...
}
handleRequestMessage�IJ���������֮ǰ����handler�е�ί����MessagingMethodInvokerHelperȥ�������ж�Ӧ�Ķ˵㷽����Ȼ���ִ�н������outputChannel���������ֱ�Ӷ�λ������ķ��Ͳ�����
	@Override
	protected boolean doSend(Message<?> message, long timeout) {
		Assert.notNull(message, "'message' must not be null");
		try {
			if (this.queue instanceof BlockingQueue) {
				BlockingQueue<Message<?>> blockingQueue = (BlockingQueue<Message<?>>) this.queue;
				if (timeout > 0) {
					return blockingQueue.offer(message, timeout, TimeUnit.MILLISECONDS);
				}
				if (timeout == 0) {
					return blockingQueue.offer(message);
				}
				blockingQueue.put(message);
				return true;
			}
			else {
				try {
					return this.queue.offer(message);
				}
				finally {
					this.queueSemaphore.release();
				}
			}
		}
		catch (InterruptedException e) {
			Thread.currentThread().interrupt();
			return false;
		}
	}
�����⣬���Ǿ����������ݵ�ȥ�洢�ڶ������ˣ������߲��������ݾ��Ѿ������ˣ����Է��͵IJ��������Ͼ�һ�����ˡ�
�壬������Ϣ
�����Ѿ����ɣ�������ǿ�������Ѳ����ˣ���������� outputChannel.receive(0).getPayload()������
/**
* �Ӹ�ͨ�����յ�һ��������Ϣ�� ���ͨ���������κ���Ϣ����˷�����������ֱ������ij�ʱʱ���ȥ�� ���ָ���ij�ʱʱ��Ϊ 0����÷������������ء� ���С���㣬�����������������μ�receive() ����
* ������
* timeout - �Ժ���Ϊ��λ�ij�ʱʱ��
* ���أ�
* ����ڷ����ʱ����û�п��õ���Ϣ������̱߳��жϣ���Ϊ��һ��������Ϣ��null ��
*/
@Override // NOSONAR complexity
@Nullable
public Message<?> receive(long timeout) {
...
try {
//����ǰ����������
if (interceptorList.getSize() > 0) {
interceptorStack = new ArrayDeque<>();
//һ�����ý��ղ���ʵ�ʼ�����Ϣ֮ǰ����
if (!interceptorList.preReceive(this, interceptorStack)) {
return null;
}
}
//���ղ���
Message<?> message = doReceive(timeout);
...
//�ڼ����� Message ֮���ڽ��䷵�ظ�������֮ǰ�������á� ��Ҫʱ��������Ϣ
if (interceptorStack != null && message != null) {
message = interceptorList.postReceive(message, this);
}
//�ڽ�����ɺ���ã����������������κ��쳣���Ӷ������ʵ�����Դ����
interceptorList.afterReceiveCompletion(message, this, null, interceptorStack);
return message;
}
catch (RuntimeException ex) {
...
}
}
����doReceive��������ʵ��Ҷ���֪�����ˣ����Ǵ�����Ķ�����ֱ�Ӷ�ȡ���ݣ�����Ƚϼ��Ͳ�ע���ˣ�
	@Override
	@Nullable
	protected Message<?> doReceive(long timeout) {
		try {
			if (timeout > 0) {
				if (this.queue instanceof BlockingQueue) {
					return ((BlockingQueue<Message<?>>) this.queue).poll(timeout, TimeUnit.MILLISECONDS);
				}
				else {
					return pollNonBlockingQueue(timeout);
				}
			}
			if (timeout == 0) {
				return this.queue.poll();
			}

			if (this.queue instanceof BlockingQueue) {
				return ((BlockingQueue<Message<?>>) this.queue).take();
			}
			else {
				Message<?> message = this.queue.poll();
				while (message == null) {
					this.queueSemaphore.tryAcquire(50, TimeUnit.MILLISECONDS); // NOSONAR ok to ignore result
					message = this.queue.poll();
				}
				return message;
			}
		}
		catch (InterruptedException e) {
			Thread.currentThread().interrupt();
			return null;
		}
	}
��������
�ܼ�ֿ�����ģ������϶�����ʿ�ˡ���һϵ�е�ִ�й�����ʵ���DZȽ��Ƶģ��ҹ�����Щ�˿���Ҳ�����������ʵ���Ѿ��������������࣬Spring-Integration��ʵ�漰����Ӧ�÷�֧���࣬����Ҳֻ��ʮ�ֻ����Ķ�������ֻ�ܰ����Լ�֪�����ȼ�¼��������������Spring-Integration��������Ȥ���DZ��ĵ�Ŀ�ľʹﵽ�ˡ�����Ҫ���Լ�ȥʵ�ز����о��£��������ջ�ġ�O(��_��)Oлл
bk
