<?xml version="1.0" encoding="UTF-8"?>
<project xmlns="http://maven.apache.org/POM/4.0.0" xmlns:xsi="http://www.w3.org/2001/XMLSchema-instance"
    xsi:schemaLocation="http://maven.apache.org/POM/4.0.0 https://maven.apache.org/xsd/maven-4.0.0.xsd">
    <modelVersion>4.0.0</modelVersion>
    <groupId>com.test</groupId>
    <artifactId>Test</artifactId>
    <version>1-SNAPSHOT</version>
    <name>Test</name>
    <description>Demo project for Spring Boot</description>

    <properties>
        <java.version>1.8</java.version>
        <project.build.sourceEncoding>UTF-8</project.build.sourceEncoding>
        <project.reporting.outputEncoding>UTF-8</project.reporting.outputEncoding>
        <spring-boot.version>2.3.7.RELEASE</spring-boot.version>
    </properties>

    <dependencies>
        <dependency>
            <groupId>org.springframework.boot</groupId>
            <artifactId>spring-boot-starter-web</artifactId>
        </dependency>

        <dependency>
            <groupId>org.springframework.boot</groupId>
            <artifactId>spring-boot-starter-test</artifactId>
            <scope>test</scope>
            <exclusions>
                <exclusion>
                    <groupId>org.junit.vintage</groupId>
                    <artifactId>junit-vintage-engine</artifactId>
                </exclusion>
            </exclusions>
        </dependency>

    </dependencies>

    <dependencyManagement>
        <dependencies>
            <dependency>
                <groupId>org.springframework.boot</groupId>
                <artifactId>spring-boot-dependencies</artifactId>
                <version>${spring-boot.version}</version>
                <type>pom</type>
                <scope>import</scope>
            </dependency>
        </dependencies>
    </dependencyManagement>

    <build>
        <plugins>
            <plugin>
                <groupId>org.apache.maven.plugins</groupId>
                <artifactId>maven-compiler-plugin</artifactId>
                <version>3.8.1</version>
                <configuration>
                    <source>1.8</source>
                    <target>1.8</target>
                    <encoding>UTF-8</encoding>
                </configuration>
            </plugin>
            <plugin>
                <groupId>org.springframework.boot</groupId>
                <artifactId>spring-boot-maven-plugin</artifactId>
                <version>2.3.7.RELEASE</version>
                <configuration>
                    <mainClass>com.test.main.TestApplication</mainClass>
                </configuration>
                <executions>
                    <execution>
                        <id>repackage</id>
                        <goals>
                            <goal>repackage</goal>
                        </goals>
                    </execution>
                </executions>
            </plugin>
        </plugins>
    </build>

</project>
<dependency>
            <groupId>org.springframework.boot</groupId>
            <artifactId>spring-boot-devtools</artifactId>
            <scope>runtime</scope>
            <optional>true</optional>
</dependency>
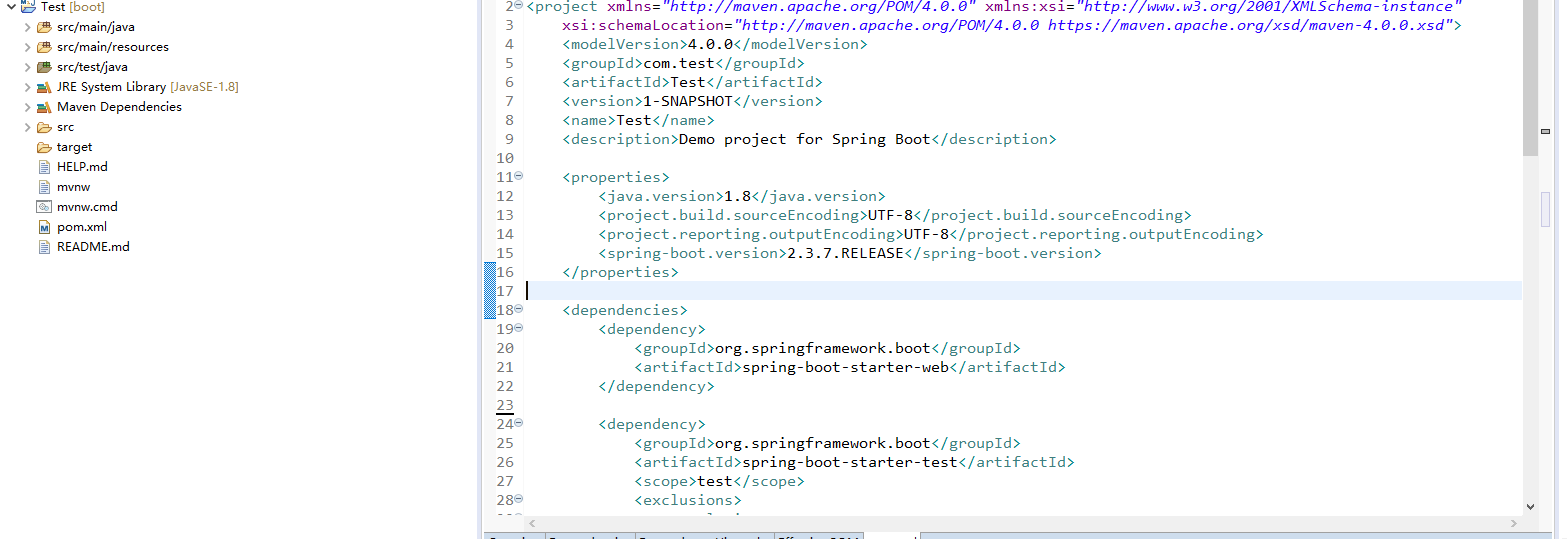
devtools版本号的话无需多说,都是SpringBoot自己管理,都是有一一对应的
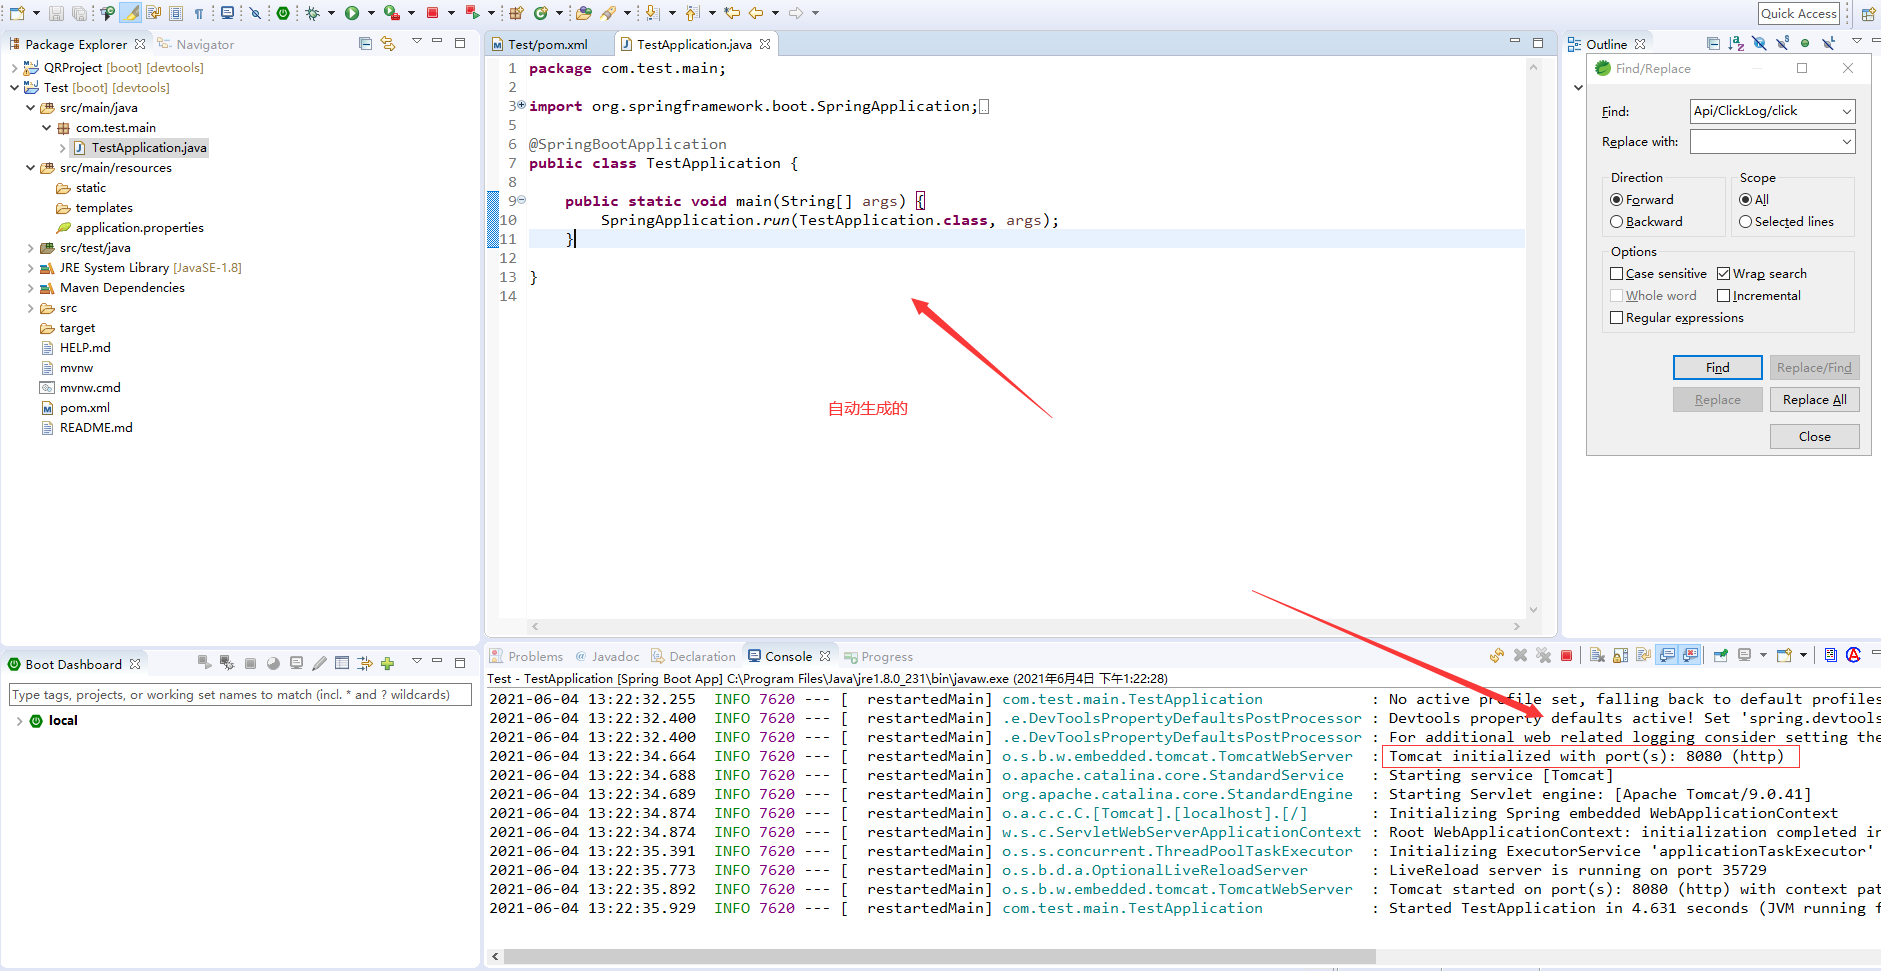
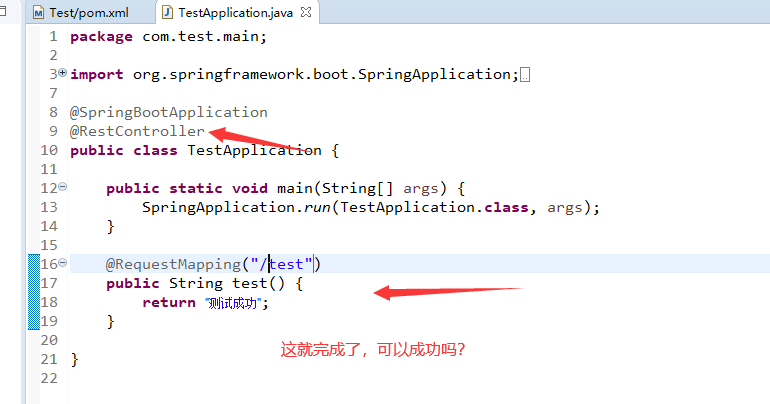
1.3、测试
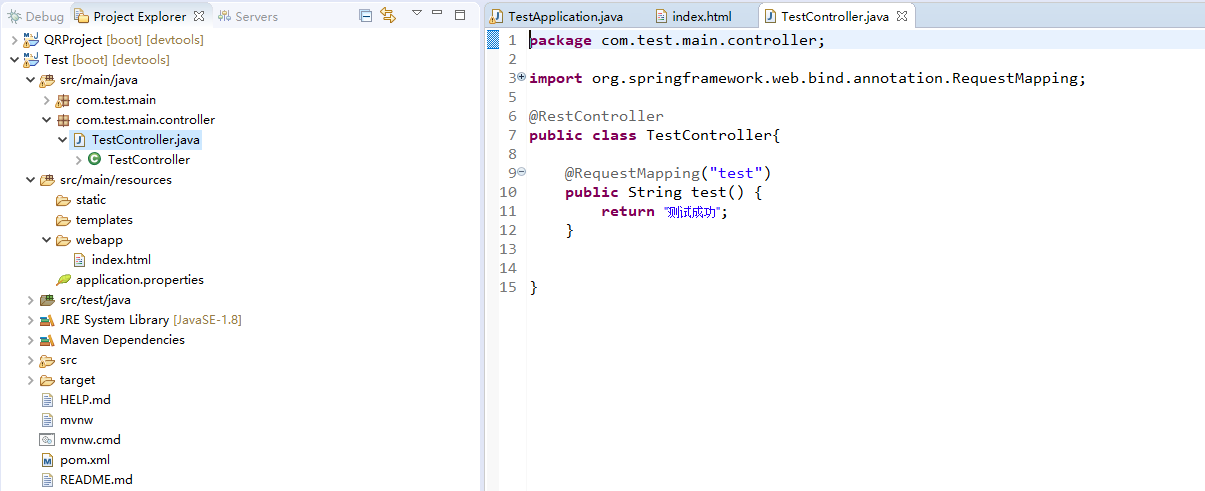
可以启动成功了,可以写测试接口了
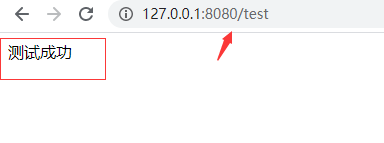
添加热部署后,不需要重启项目,直接来测试
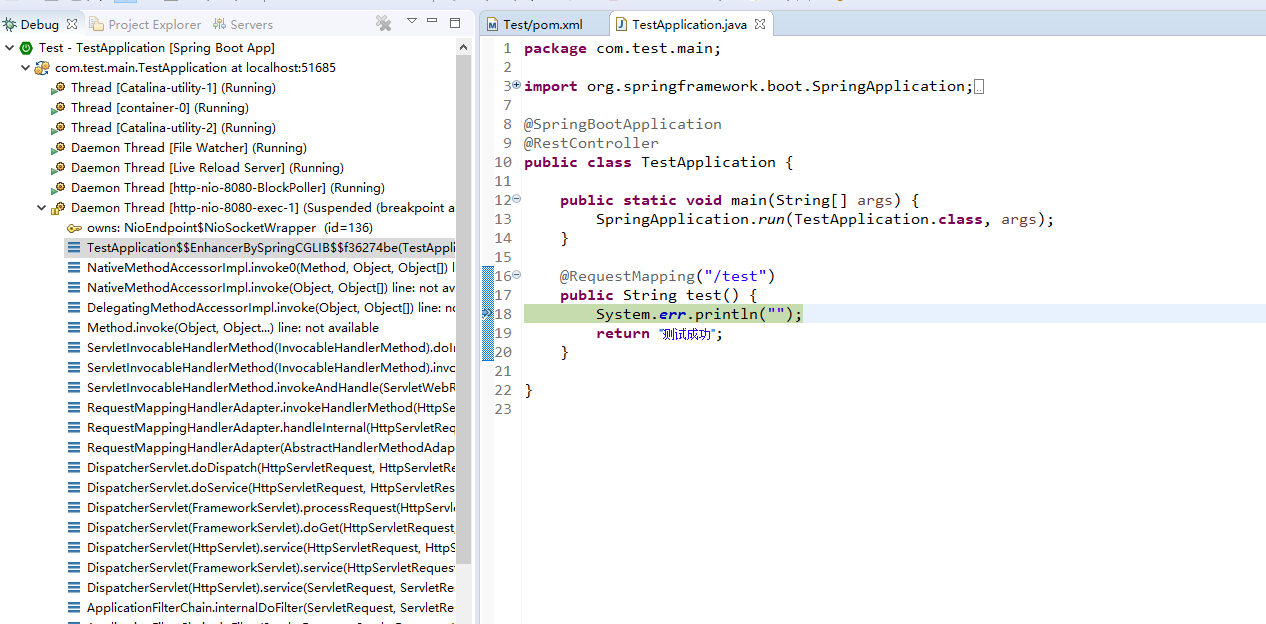
还不信,我们可以打个断点,用debug模式运行
到这里,后台测试完成了,那么前台资源怎么弄,为什么说坑?
我们知道,如何是一个web项目的时候,我们是有一个webApp目录,但是我们项目现在是没有的,那要不要加进去?
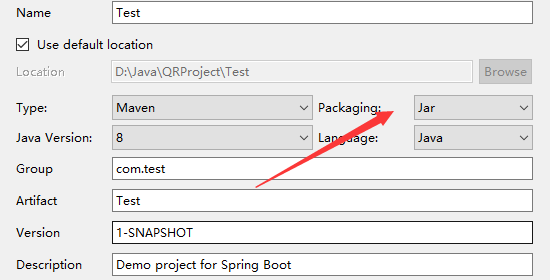
而且我不知道大家有没有发现,我们创建项目的时候,用的是jar包的形式,不是war包
为了测试方便,代码规范,我们把启动类的测试方法提取到controller层来
2、跳转前端页面
问题来了,这怎么跳转到HTMl页面去呢
开始呀,我也就随便写个方法试试,好家伙跳了个寂寞,直接404
我不知道大家发现没,你们在写web项目时,controller注解使用的是个啥,不应该是@Controller注解么?
我用的是@RestController,这个注解又是什么鬼
不应该是说跳转页面么?怎么又说到注解了?大家别急看完就知道了
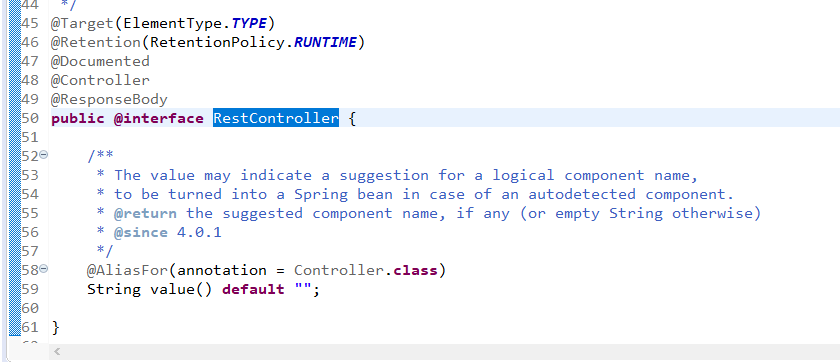
这个@RestController注解的StringBoot独有的,它里面已经包含了@ResponseBody了,也正因为是标注在类上了,所以标注了@RestController的类不能实现页面跳转,
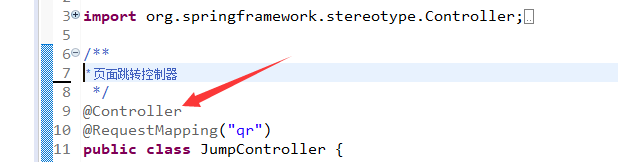
如果要跳转页面,重定向页面的话,只能新建一个controller类,标记上@Controller注解,千万别标记错了
你以为这样就行了么?
想想你在开发SSM框架时,写的那么多配置文件,是不是有点太简单了
2.1、thymeleaf
那我告诉你,确实没有那么简单,但是也不难,我们还需要加上一个组件,这个组件的名字就是thymeleaf
它的pom是
<dependency>
    <groupId>org.springframework.boot</groupId>
    <artifactId>spring-boot-starter-thymeleaf</artifactId>
</dependency>
这个玩意干嘛的?
这个就是java模板引擎,听起来是不是挺高大尚的,其实就是以前你们写SpringMVC的东西,就是加前端视图解析器等一些玩意啦
说那么多都没啥用,自己看一下SpringBoot对它的一些默认配置规则吧
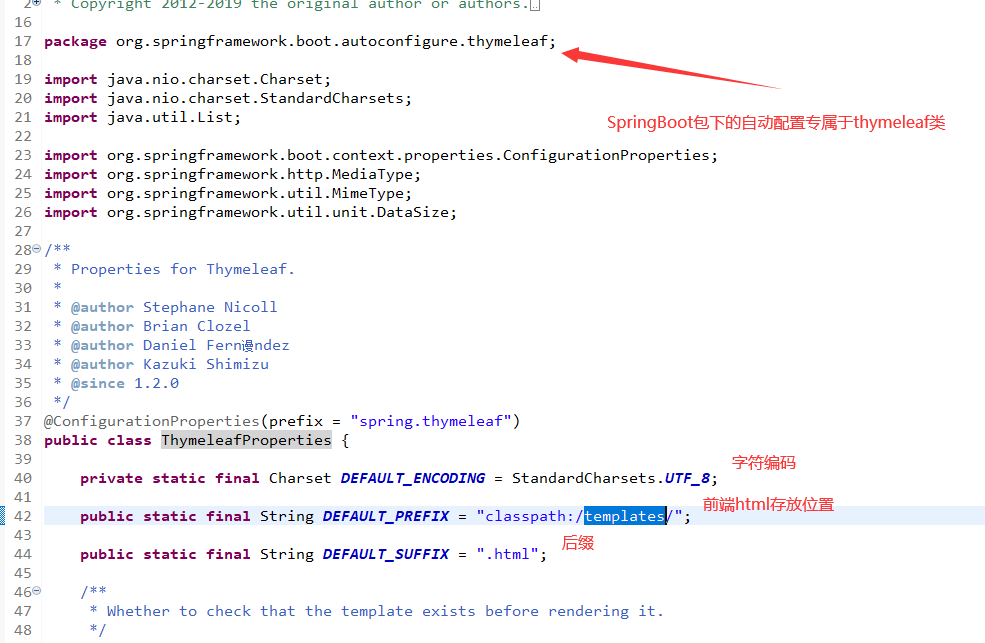

看到这里应该就不需要在进行多说了吧,我们就不需要写SpringMVC的配置文件了,按照它默认的配置对应的放进去就好了
2.2、thymeleaf的使用
当然,thymeleaf如果就那么一点功能那就不会说他是高大尚了,以前用jsp开发时所有该有的功能,有了thymeleaf都可以用另外一个方式使用
那到底怎么用呢,这里我就简单介绍一下,具体怎么用,有哪些功能我感觉这个大佬教的还不错,可以瞅瞅
https://fanlychie.github.io/post/thymeleaf.html
<!DOCTYPE HTML>
<html xmlns:th="http://www.thymeleaf.org">   <!--一定要在html标签中加上哦-->
<head>
    <title>Index Page</title>
    <meta http-equiv="Content-Type" content="text/html; charset=UTF-8" />
</head>
<body>
    <p th:text="${message}">Welcome to BeiJing!</p